A frequent question we get is how to manually upload a workout file to an athlete’s calendar or to an existing planned workout on that athlete’s calendar. This blog will detail out the steps to do this, and also show you how to manually export these files from Garmin Connect and from Strava (scroll to the bottom of this blog for instructions on exporting files from these platforms).
Uploading a New Workout to your Calendar
Navigate to the day that you did the workout on, hover over it, and then click on the plus sign at the top of the day. A drop-down menu will appear. Click the “Upload Data” option from this menu.
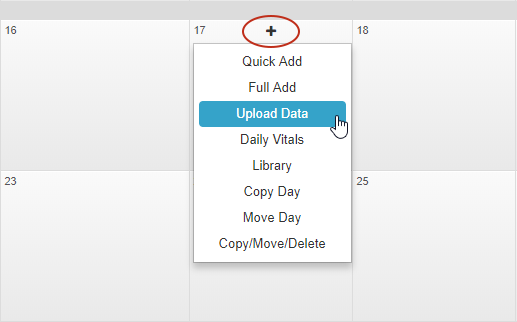
Clicking on “Upload Data” will open up the following modal window:
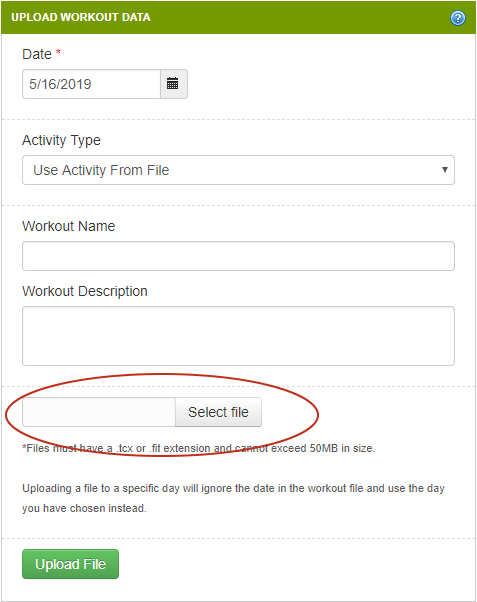
Choose the “Select file” button to select the FIT or TCX that you would like to upload. If you want to override the type of workout that is used for the file, select a different Activity Type from the drop-down menu under the date. This will ignore the file type that is recorded in the file and will change the workout to the type you select (so if your watch recorded it as a cross training workout but it was really a run, you can make this change here). Otherwise, leave “Use Activity From File” selected and the type of workout will be determined from the file itself. If you would like to add a name or description to this workout, you can do so from this window before clicking “Upload File”.
Once the file has been uploaded, you will be redirected to the workout details page to view the results of this workout.
Uploading a Workout to an Existing Planned Workout on your Calendar (or overwriting completed workout data)
If you have a planned workout on your calendar that you would like to upload your results directly to, or if you have a completed workout that you want to overwrite the results of, you can do this by clicking on the workout directly on the calendar.
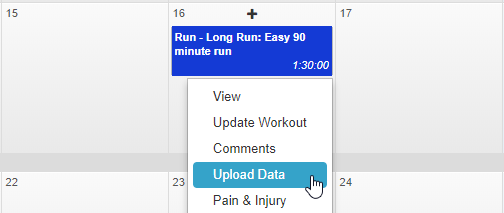
A menu will appear when you click on the workout. Select “Upload Data” from this menu. Once you have clicked this option, a modal window will appear with the date and the title of the existing workout at the top of it:
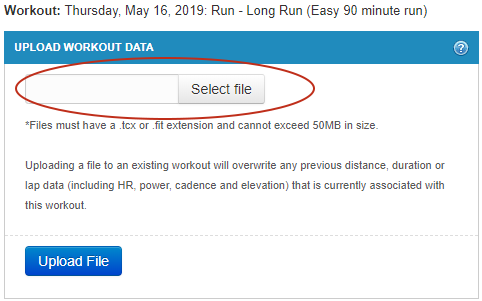
Click on “Select file” to choose the FIT or TCX file that you would like to upload to this existing workout on your calendar. Once you have selected the file, click the blue “Upload File” button. The file will then be uploaded and you will be redirected to the workout details page of the newly uploaded workout.
Exporting FIT and TCX Files from Garmin Connect
If you have a Garmin watch or cycling computer and need to get an original FIT or TCX file of a workout to manually upload to Final Surge, you can get the file from the Garmin Connect web platform. First, log into the Garmin Connect web platform: https://connect.garmin.com/
Once you are logged in, expand the navigation on the left of the page, click on Activities, and then click on “All Activities”.
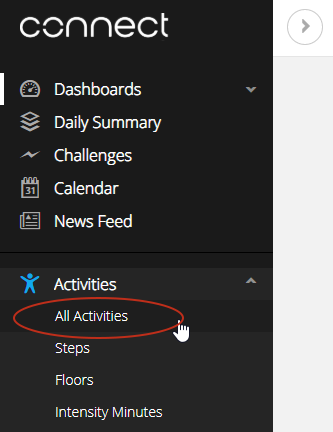
This page will display a list of all your most recent workouts. Click on the name of the workout to view the details:

In the top right-hand corner of the workout details page is a set of icons. Click on the cogwheel icon on the far left:

Once you click on the cogwheel icon a menu will appear. All new Garmin watches create FIT files and this is the most preferable file format as it contains more data than other types of files. To download the FIT file, click on the “Export Original” option. This will allow you to download the original FIT file from your device in a zipped format. You will then need to un-zip the file before uploading the FIT file to Final Surge.
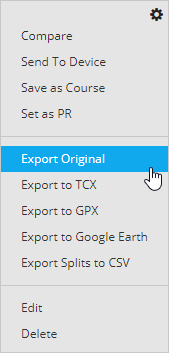
If you have an older watch, you can also download a TCX version of your workout by clicking on “Export TCX”. This will allow you to download the TCX file directly which you can then upload to Final Surge.
Exporting TCX Files from Strava
If you are a Strava user and need to export a TCX file so that you can manually upload that file to Final Surge, there is an easy method to get the TCX file version of your workout. First, log into the full web version of Strava: http://www.strava.com/
Once you are logged in, click on the workout that you want to export and view its full details. This can be done by finding the workout on your Strava Dashboard Activity Feed, or, by clicking on Training and navigating to the My Activities page and finding the workout that way.
Once you are viewing the full details of your workout, look at the URL of the page in your browser window. It will look something like this: https://www.strava.com/activities/2109941802

At the end of the URL in your browser, add the text “/export_tcx” to the end of the URL (without the quotes). The new URL will look like this:
https://www.strava.com/activities/2109941802/export_tcx
Hit enter in the URL text box after you have added this to the end of the URL:

Once the page loads, the TXC version of your file will automatically download. Depending on what browser you are using and what operating system you have, the file may be downloaded to a different location on your computer. If using Chrome on Windows, you will see the file download at the bottom of the browser and it will save to your Downloads folder unless you have specified otherwise:

Click on the file to find out the location of where it has been saved. You can now manually upload this TCX file to Final Surge using one of the methods at the top of this blog post.

