To access the new bulk copy/move/delete feature, click on the calendar day that you want to start copying, moving or deleting. By clicking on the plus sign a dropdown menu will appear. Click on “Copy/Move/Delete” at the bottom of the dropdown menu.

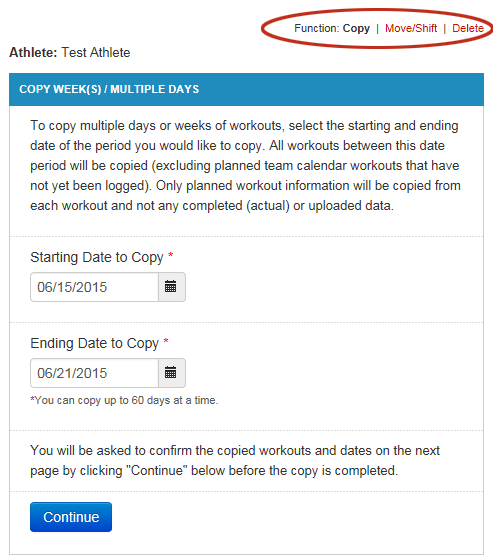
A pop-up window will appear that is defaulted to copying workouts. To change the functionality of copying to either moving or deleting workouts, use the links in the top right-hand corner of the pop-up menu circled below.
Copying Multiple Weeks/Days
To begin copying multiple weeks of workouts, first select the range of dates you want to copy starting with the date that the first workout to be copied appears on. Then, select the ending date to copy which would be the day the final workout you want to copy appears on. For example, if you want to copy the full month of June, you would select June 1st as the starting date and June 30th as the ending date. Once you have selected the dates to be copied, click the “Continue” button.
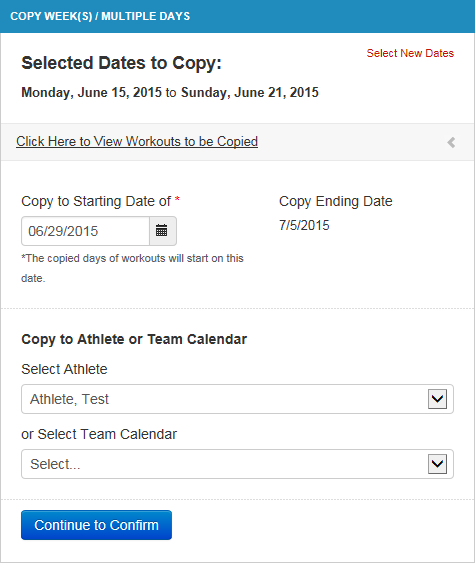
The next screen shown below allows you to verify the workouts that are in the date range you selected. Click the “Click Here to View Workouts to be Copied” link to expand that section and view a list of all the workouts you are about to copy. Secondly, you will then pick the starting date that these workouts will be copied too. Based on the starting date, the ending date will automatically be populated for you. For example, if you want to copy the month of June to the month of September, you would select September 1st as the “Copy to Starting Date of” value.
Finally, if you are a coach, you will have the option to copy these workouts to the same calendar or to the calendar of a different athlete or team. Use the dropdown menus in the “Copy to Athlete or Team Calendar” section at the bottom of the page to select where you will be copying these workouts. Click “Continue to Confirm” to see the final page of the process.
Finally, the Copy Confirmation page will be displayed. This will allow you to confirm the dates you are copying as well as the dates you are copying these workouts too, and will also let you verify the workouts on this date range and the athlete or team the workouts are going to. When you are satisfied that everything is correct, click the green “Complete Copy” button to complete the copy.
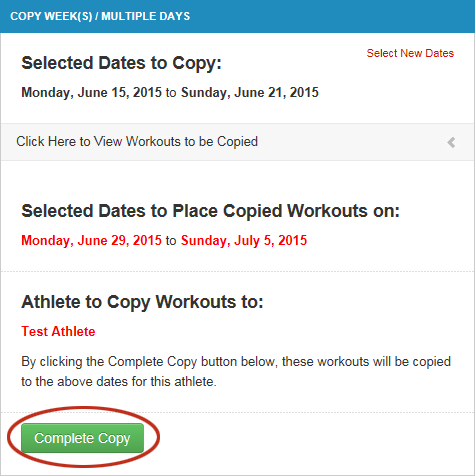
Once the copy has been completed, you will see a green success message at the top of the page. Click the “Refresh” link in that success message to refresh the calendar underneath the pop-up window to see your newly copied workouts.

Moving/Shifting Multiple Weeks/Days
In addition to copying multiple weeks of workouts, you can also move multiple weeks of workouts around an athlete or team calendar. For example, if an athlete gets injured and has to take a week off, you can shift that athlete’s entire workout schedule so that they can pick up their training when they are ready to do so. To start, click the “Move/Shift” link at the top right of the pop-up window to access the Bulk Move functionality.
The move/shift functionality works very similar to the copy functionality. You will first select the date range of workouts that you want to move on the calendar. Once you have selected your date range, click the “Continue” button.
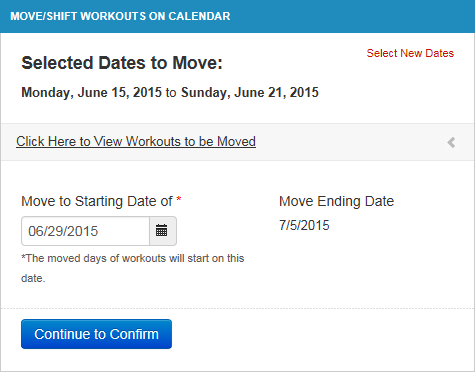
The second page will allow you to confirm the workouts that are going to be shifted on this date range. Click the “Click Here to View Workouts to be Moved” link to expand that section and see all of the workouts you are moving. Next, select the starting date of where you would like the workouts moved to. The ending date range will be automatically populated based on the starting date you selected. Once you have selected this range, click the “Continue to Confirm” button.
The final page will ask you to confirm the date range shift you have selected and give you one final chance to review the workouts that are being moved. To complete the move, click the green “Complete Move” button at the bottom of the page.
Once the move has been completed, you will see a green success message at the top of the page. Click the “Refresh” link in that success message to refresh the calendar underneath the pop-up window to see your newly moved workouts.
Deleting Multiple Weeks/Days
The final functionality of this feature allows you to delete multiple weeks of workouts at a time. This might come in handy if an athlete has a major injury or decides to change up the race they are training for mid-season. If you’d like to quickly clear multiple weeks of an athlete or team calendar at a time, use this feature. To get started, click the “Delete” link in the top-right hand corner of the pop-up window.
Similar to the copy and move functions, you will select the date range of workouts you will be deleting by choosing a starting and ending date. Click “Continue” when you have chosen these dates.
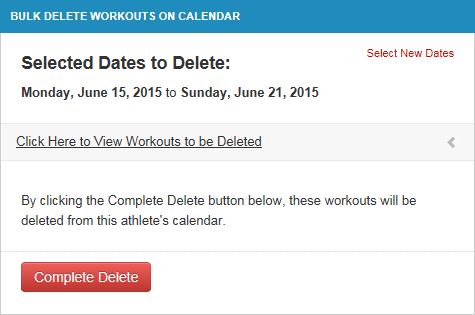
The final page will ask you to confirm the date range and give you a preview of all the workouts that will be deleted. To see these workouts, click the “Click Here to View Workouts to be Deleted” link to expand that section and see a summary of all of the workouts on the date range you selected.
Once you have confirmed the dates you want to delete, click the red “Complete Delete” button to process the delete. Once the deletion has been completed, you will see a green success message at the top of the page. Click the “Refresh” link in that success message to refresh the calendar underneath the pop-up window.
The new bulk copy, shift and delete functionality has been added to both the athlete and team calendars. In the coming days, this functionality will also be available on the training plan calendar for coaches.
We hope you enjoy this new feature. We will continue to do our best to improve Final Surge by incorporating the feedback we receive from our athletes and coaches.
Team Final Surge


