We are thrilled to announce the launch of our Attendance Roster feature, designed to make event check-ins such as group runs and team practices seamless for coaches and athletes. This feature is packed with robust tools to simplify athlete management, enhance engagement, save time and bring more value to your training sessions. With this feature, tracking attendance, rewarding athletes, and gathering valuable insights has never been easier!
What You Can Do with the Attendance Roster
The Attendance Roster allows coaches to:
Create Attendance Rosters for Events (such as a group training run, a team practice or a club event):
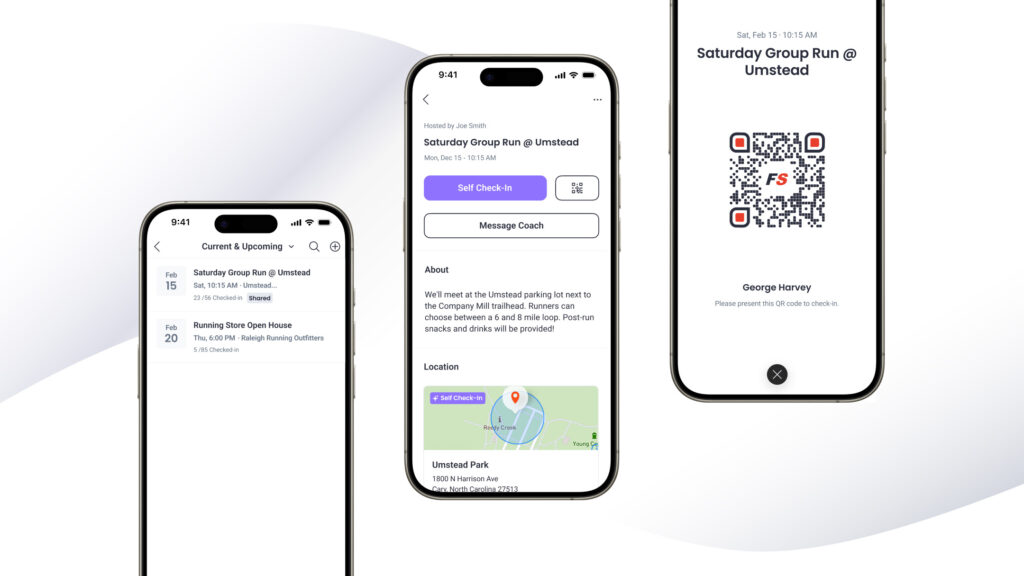
Coaches can now create an event that displays on athlete calendars and choose what athletes & teams will be attending the event. The event is set for a specific date and time, and can include an address with GPS location of the meeting spot.
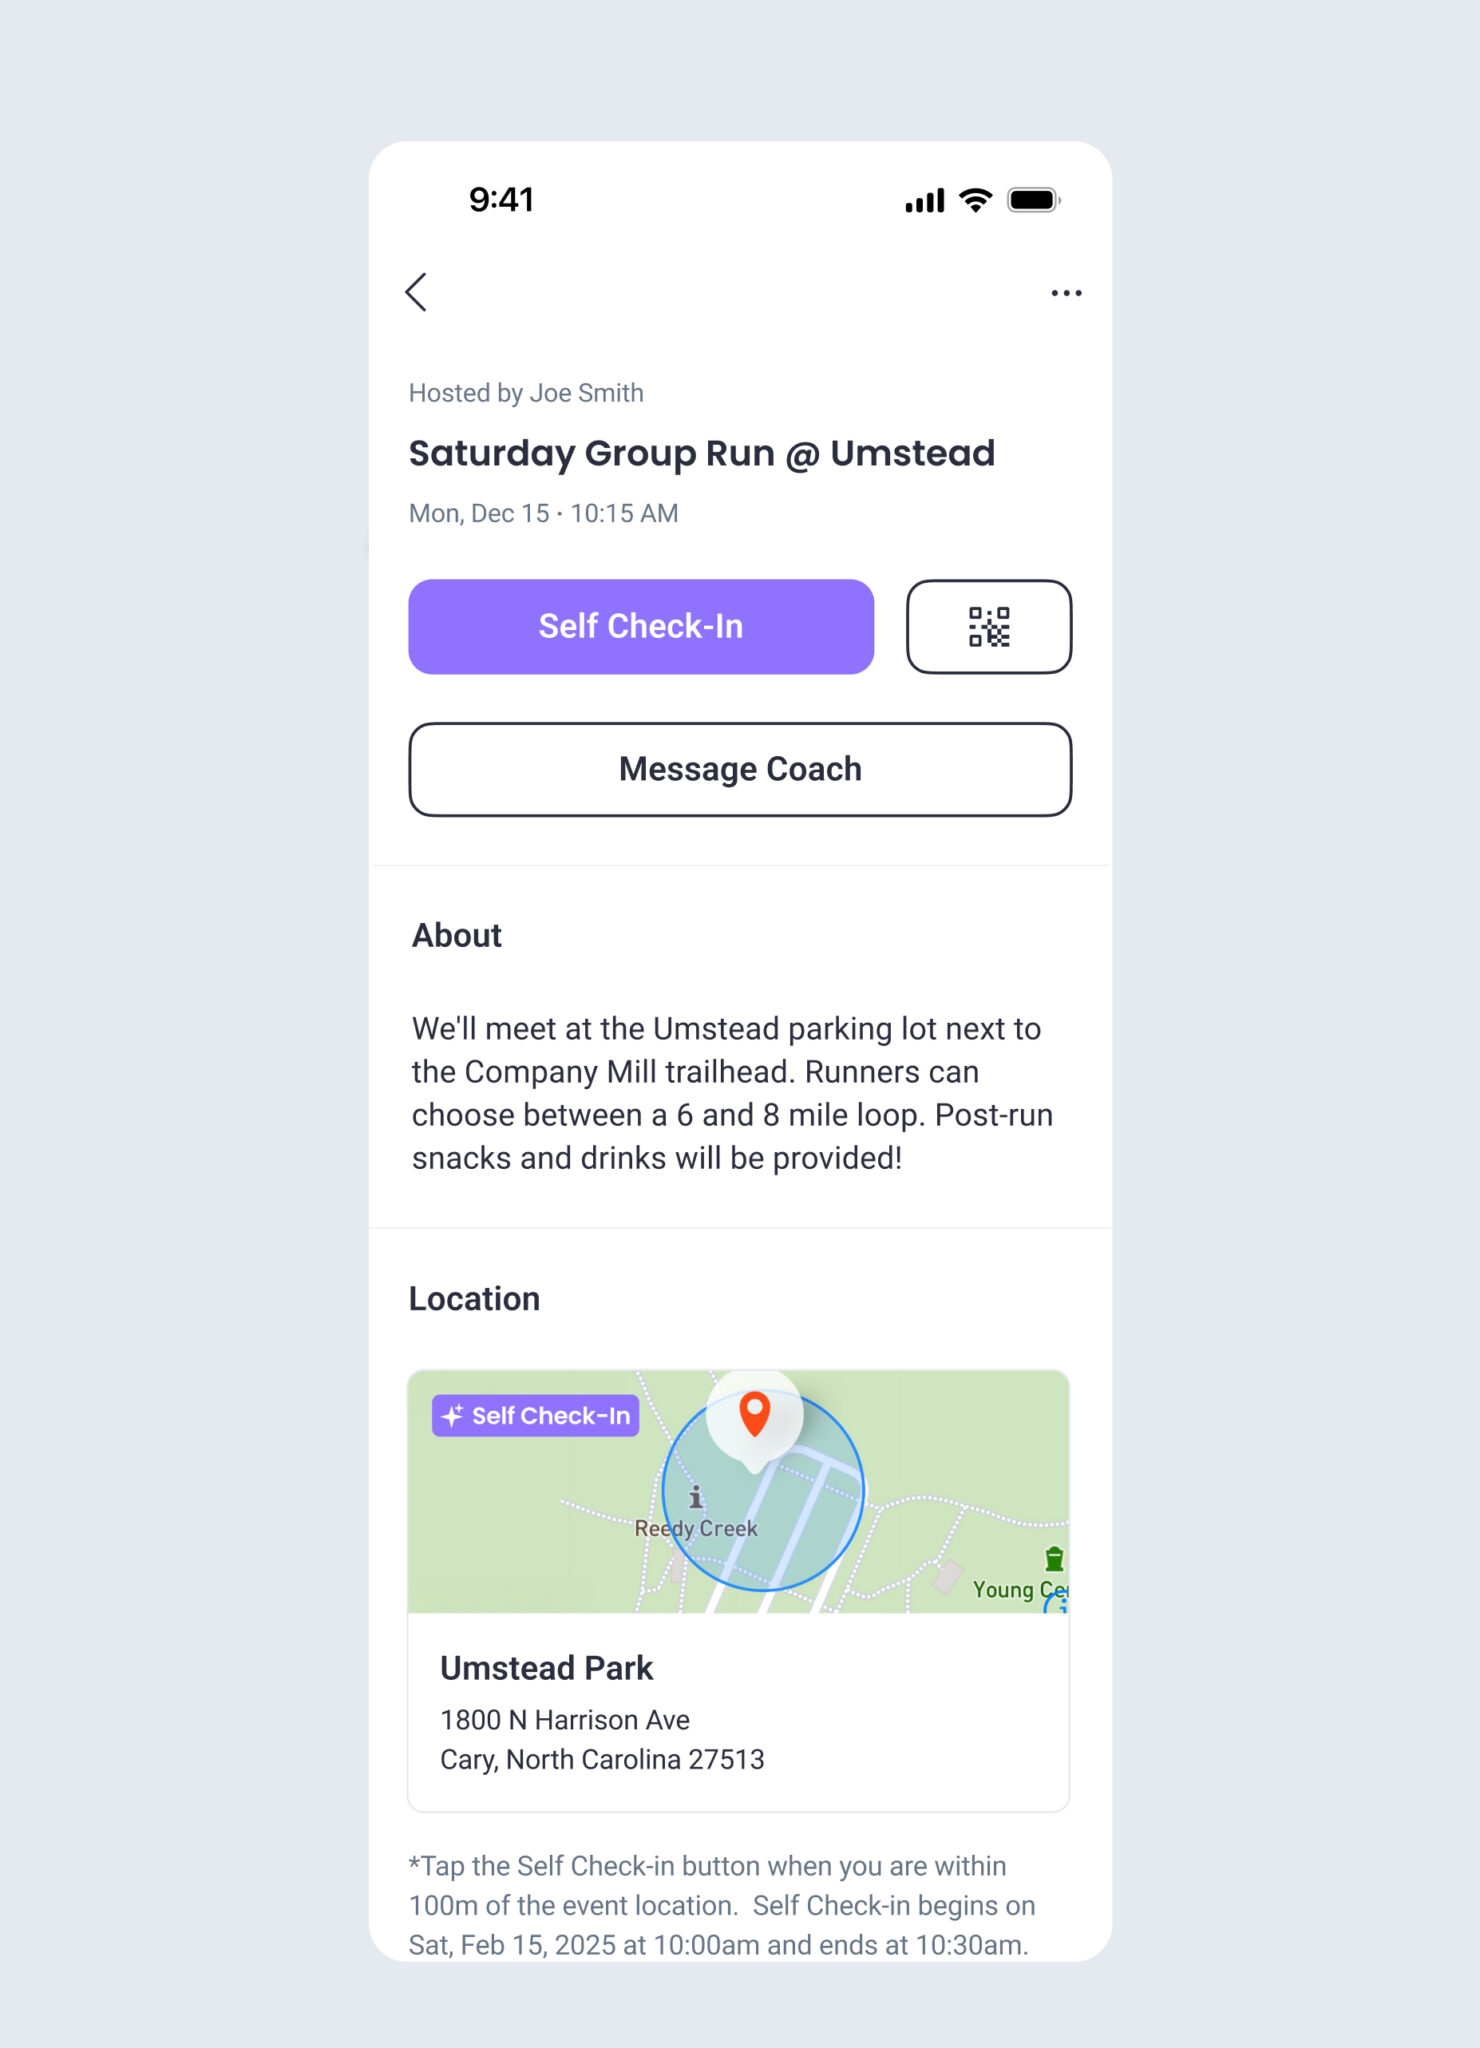
Check-In Athletes (manually or using GPS self check-in):
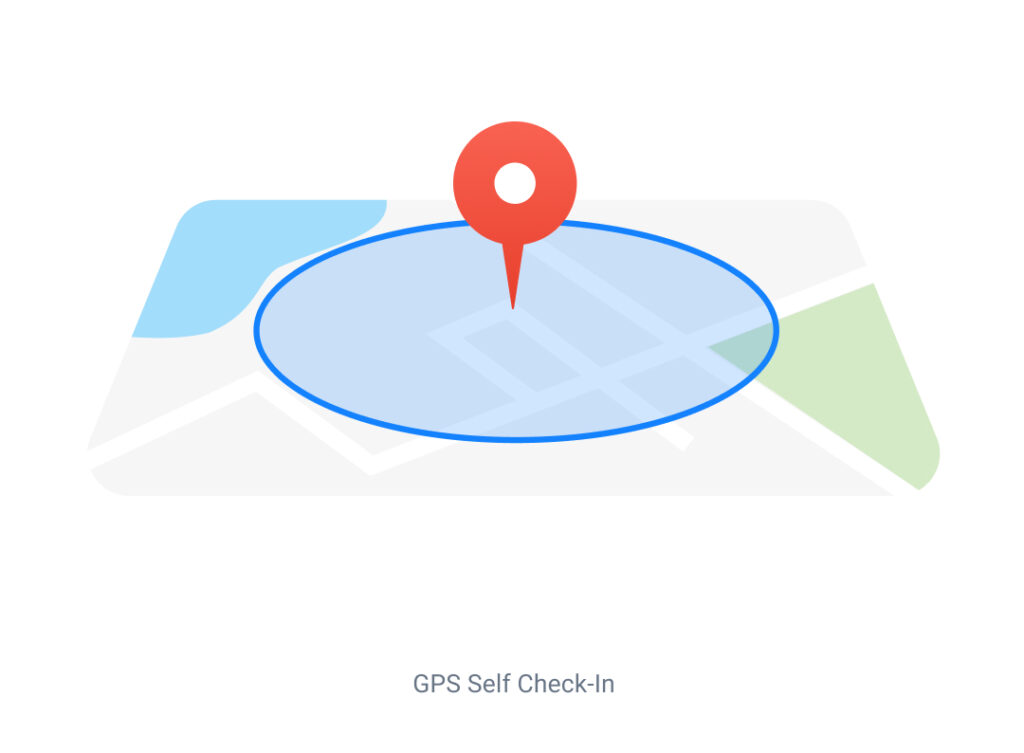
Easily mark athletes as present during events. Use the manual check-in button or the integrated QR Code Check-In option to quickly scan athletes that are in attendance. Or, enable GPS location-based self check-in. Athletes can check themselves in when they are within a certain proximity of your meeting spot. Coaches can set the exact check-in location and enable a distance perimeter around that location. Athletes within that perimeter that have the Final Surge app installed on their phone can then check themselves in.

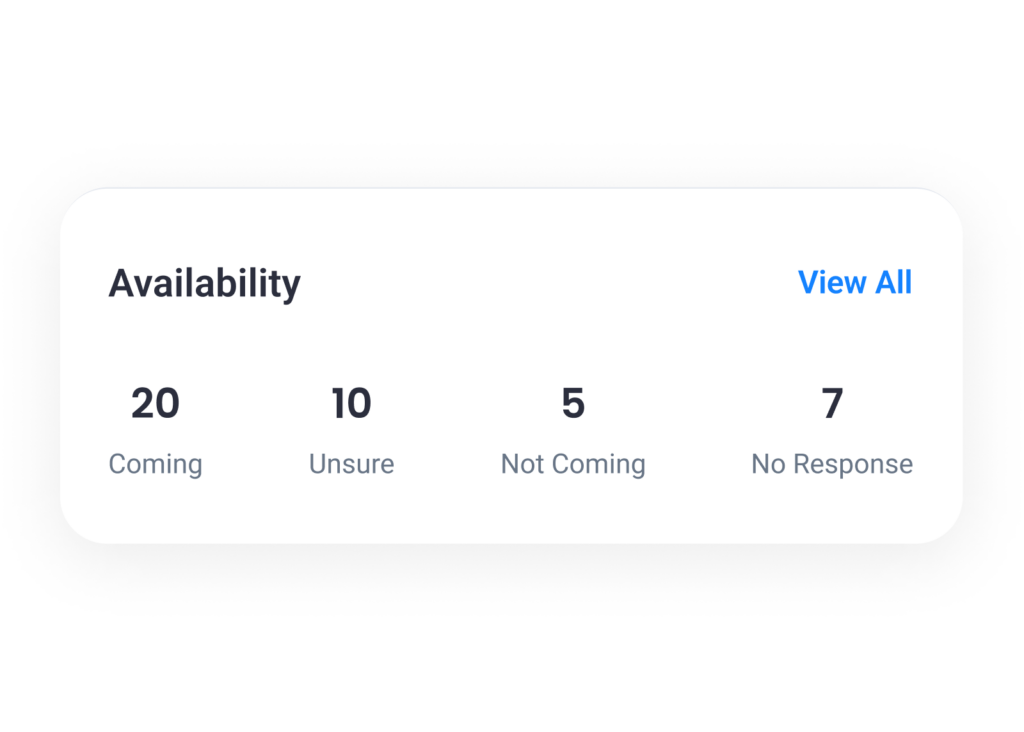
Track Availability:
View athletes’ availability before an event. Athletes can mark themselves as attending, unsure, or not attending, giving coaches an early estimate of participation.
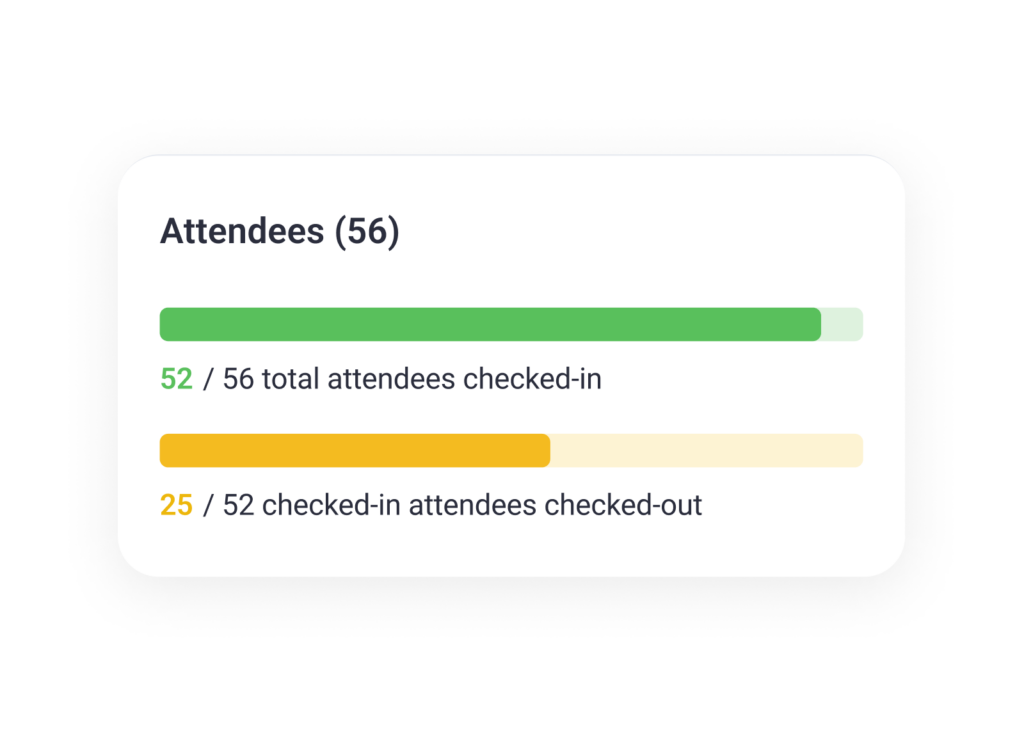
Track Check-Outs:
For events where knowing when athletes leave is critical (e.g., group runs or outdoor events), enable check-outs to ensure all athletes return safely. Coaches can manually check-out athletes or use the QR code option to scan athletes out within the Final Surge app.
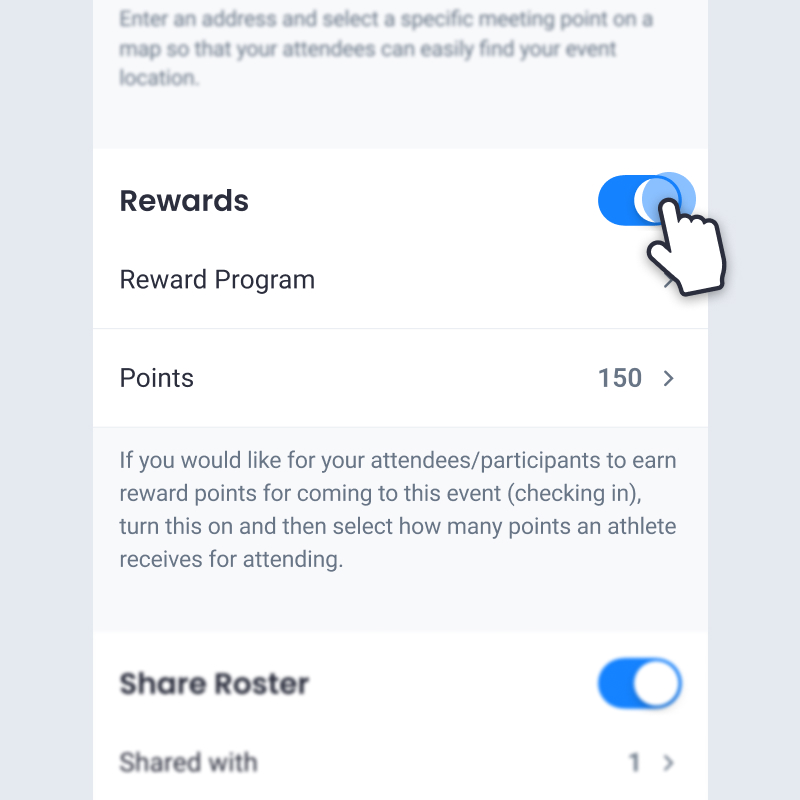
Create & Track Rewards:
Motivate athletes by assigning reward points for event attendance. Points can be tracked and redeemed as part of a reward program that can be created within Final Surge for your athletes and teams

How to Get Started with Attendance Rosters
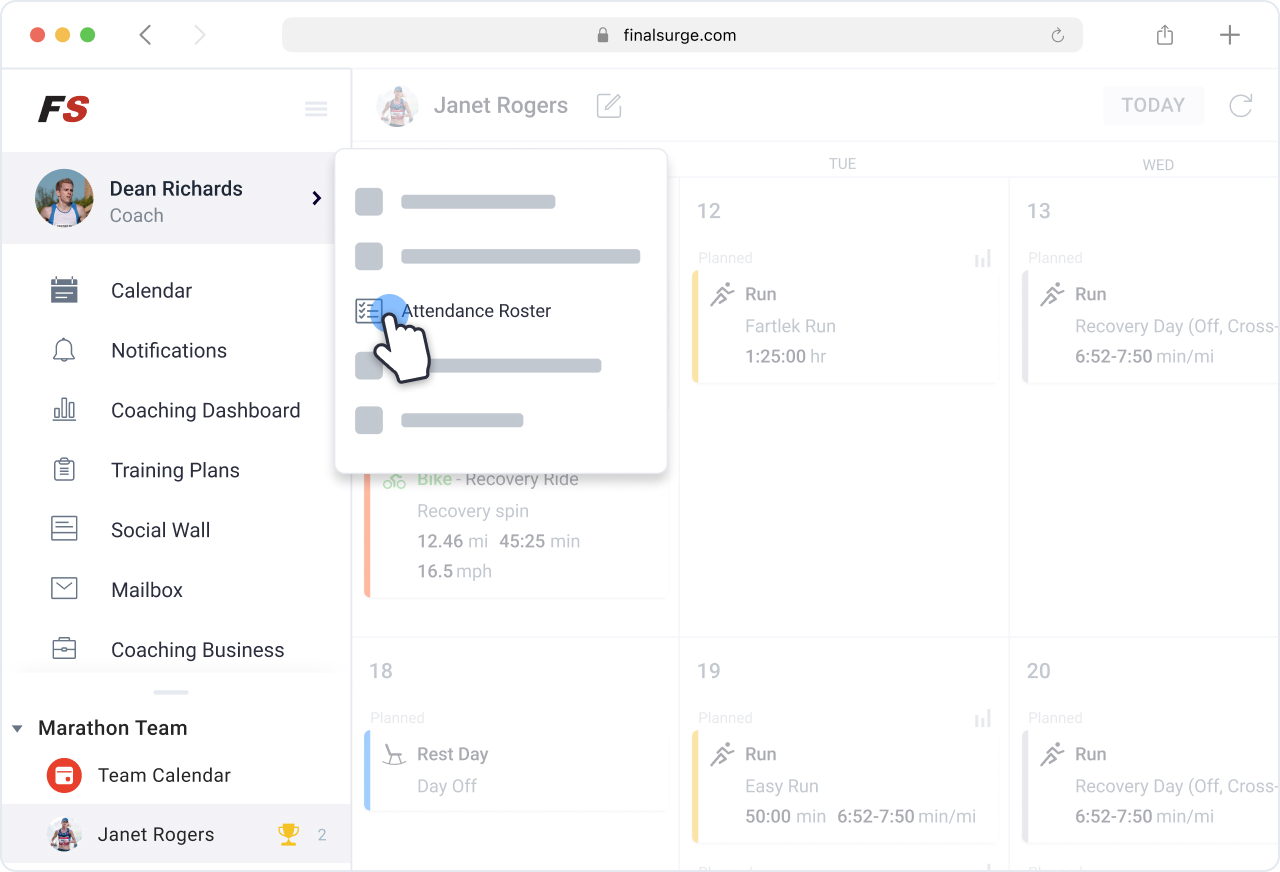
Attendance Rosters can be created and managed within both the Final Surge web platform and app. The screen shots and instructions below are from the Final Surge mobile app. To create and manage Attendance rosters in our web platform, click on your coaching navigation menu and select the new Attendance Rosters link:
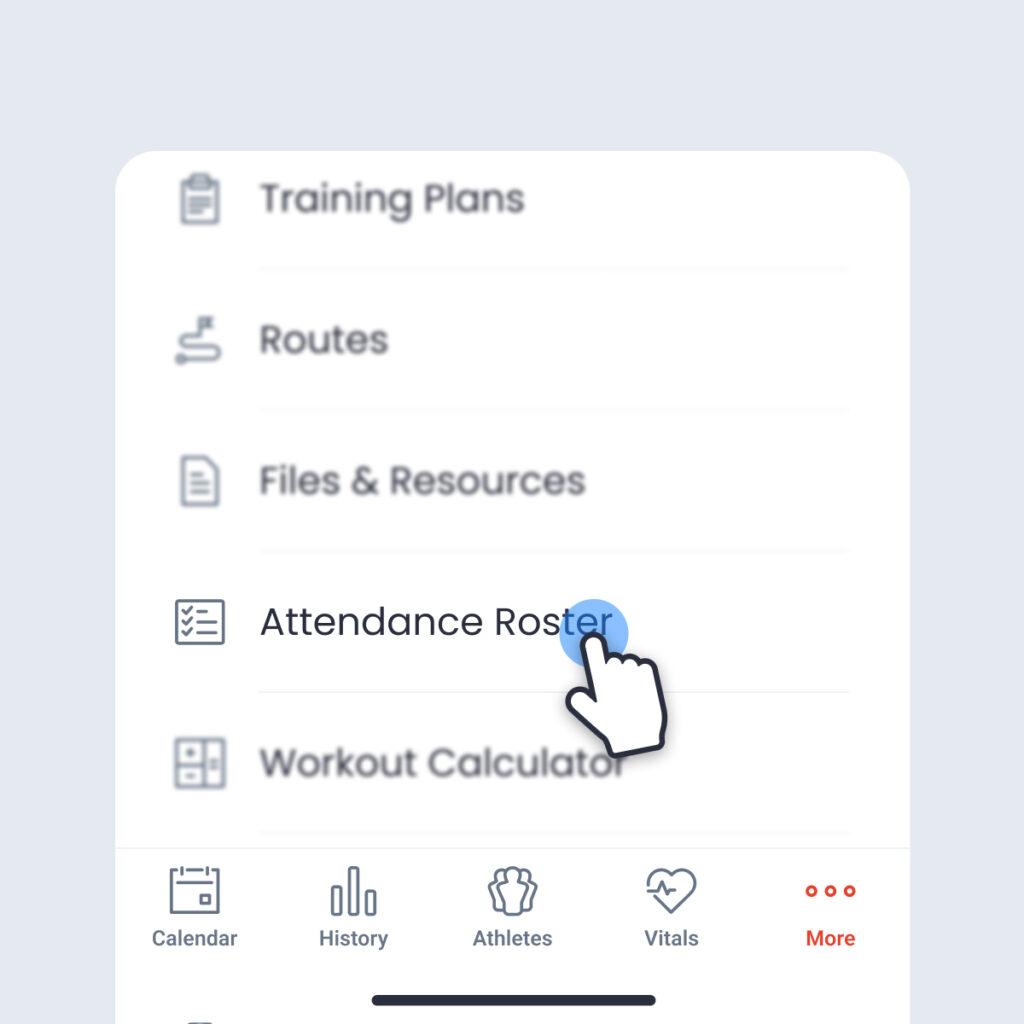
Open the Final Surge app in Coach Mode and tap on the More menu at the bottom.
Create your first Attendance Roster:
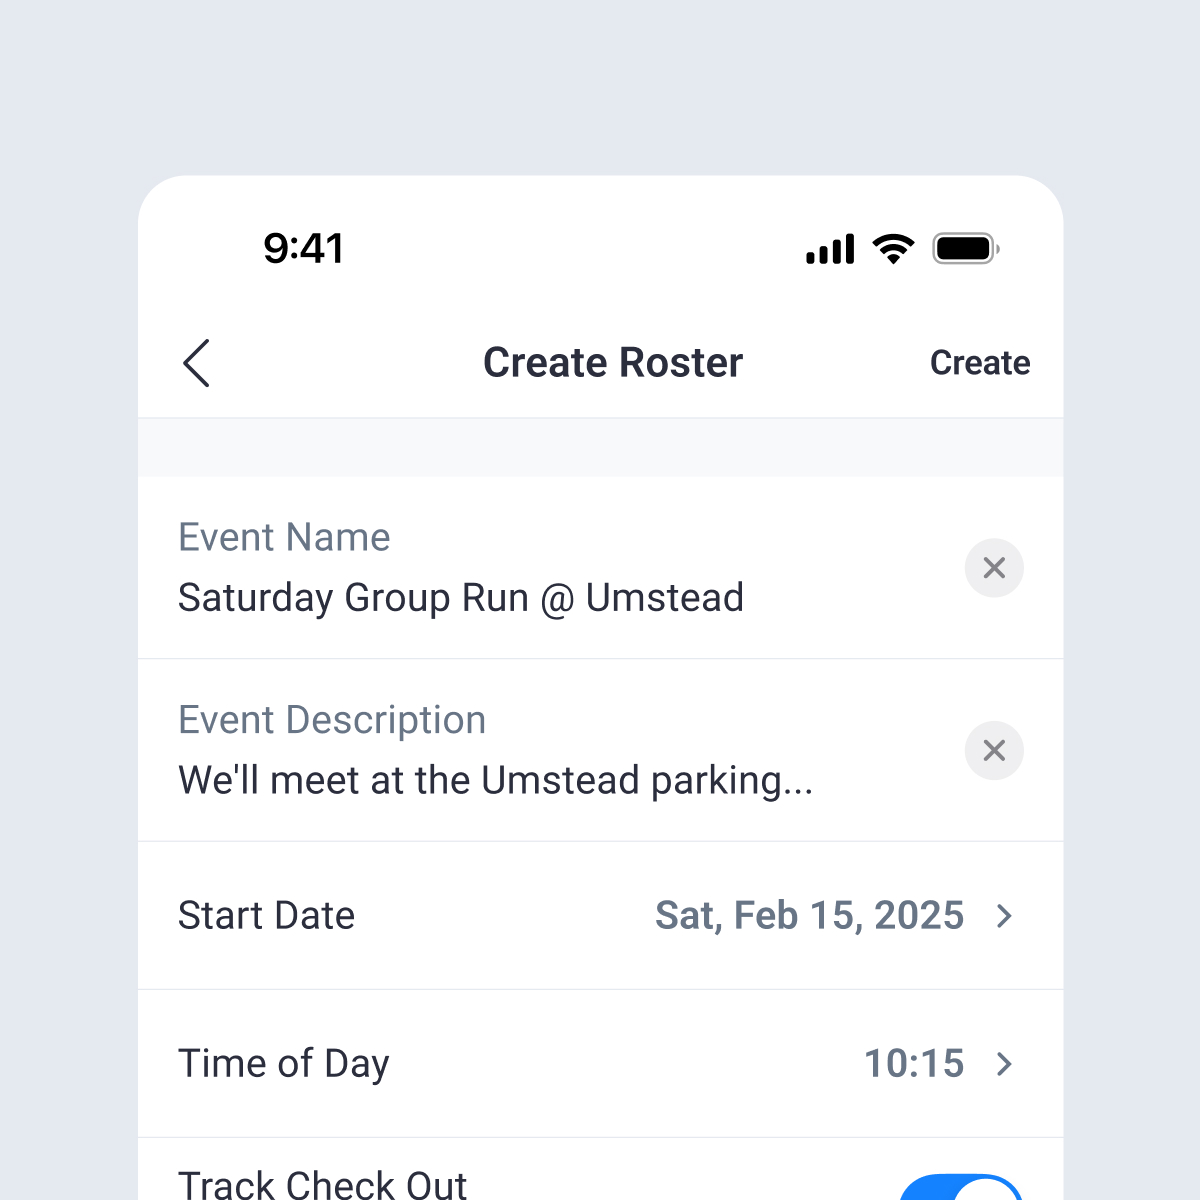
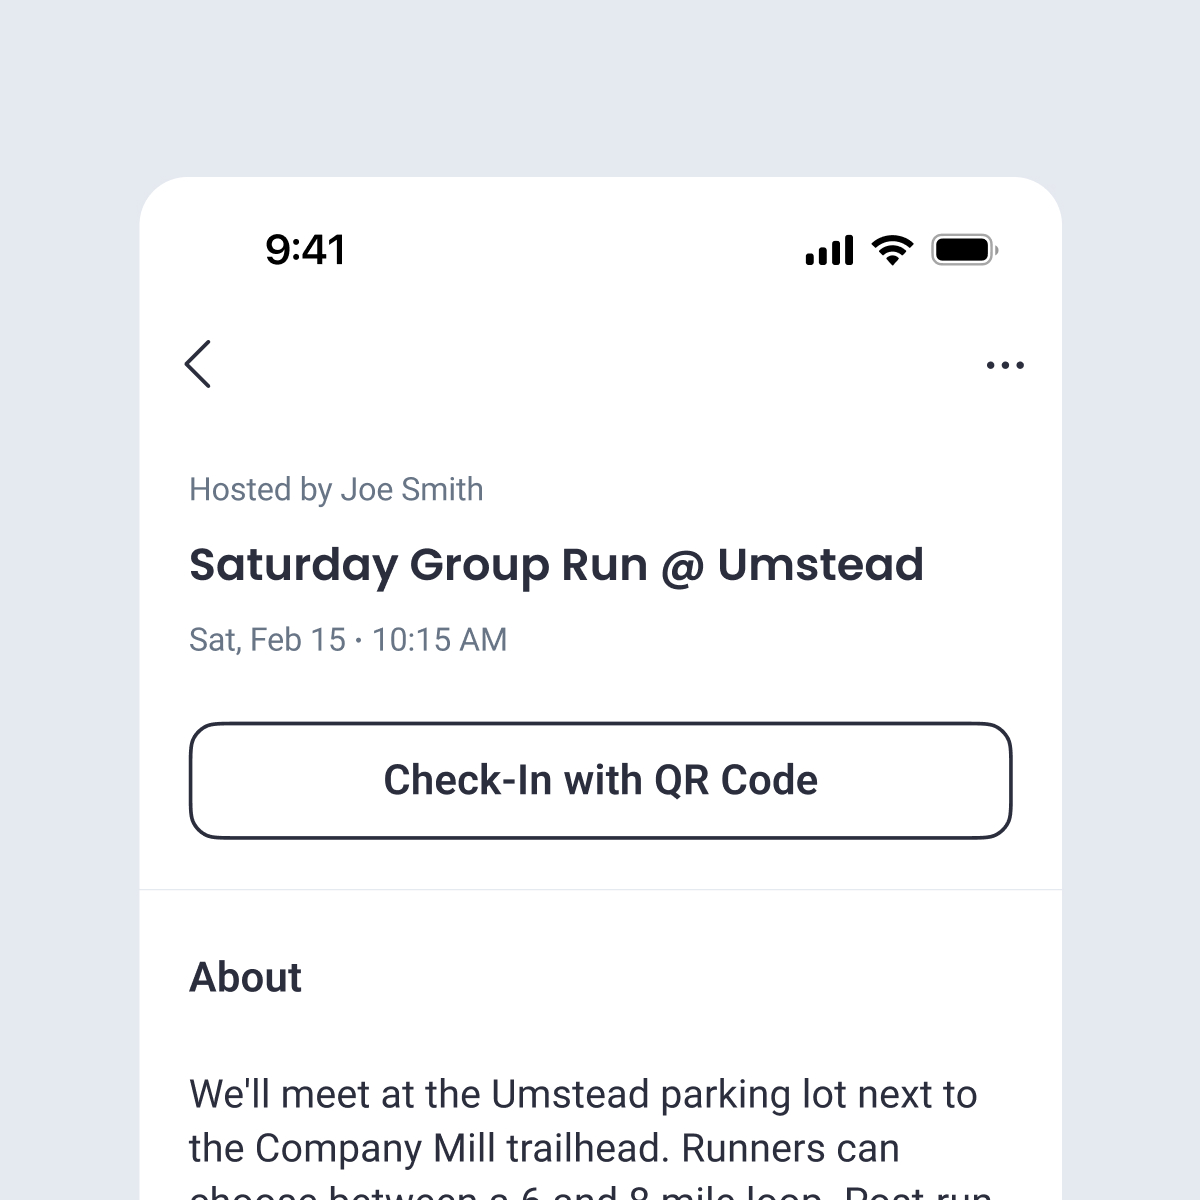
Name – The name of your event (such as “Saturday Group Run”).
Description – an optional text field that allows you to enter additional information about the event so that your participants know what to expect.
Start Date – the date this event will be held on (required).
Time of Day – the time that the event will start on the Start Date (required).
Track Check Out – use this option if your event requires that an athlete checks-out before they leave. This is great for events like group runs when you need to know that all athletes have returned safely. The check-out option is only available to an athlete after they have already checked-in.
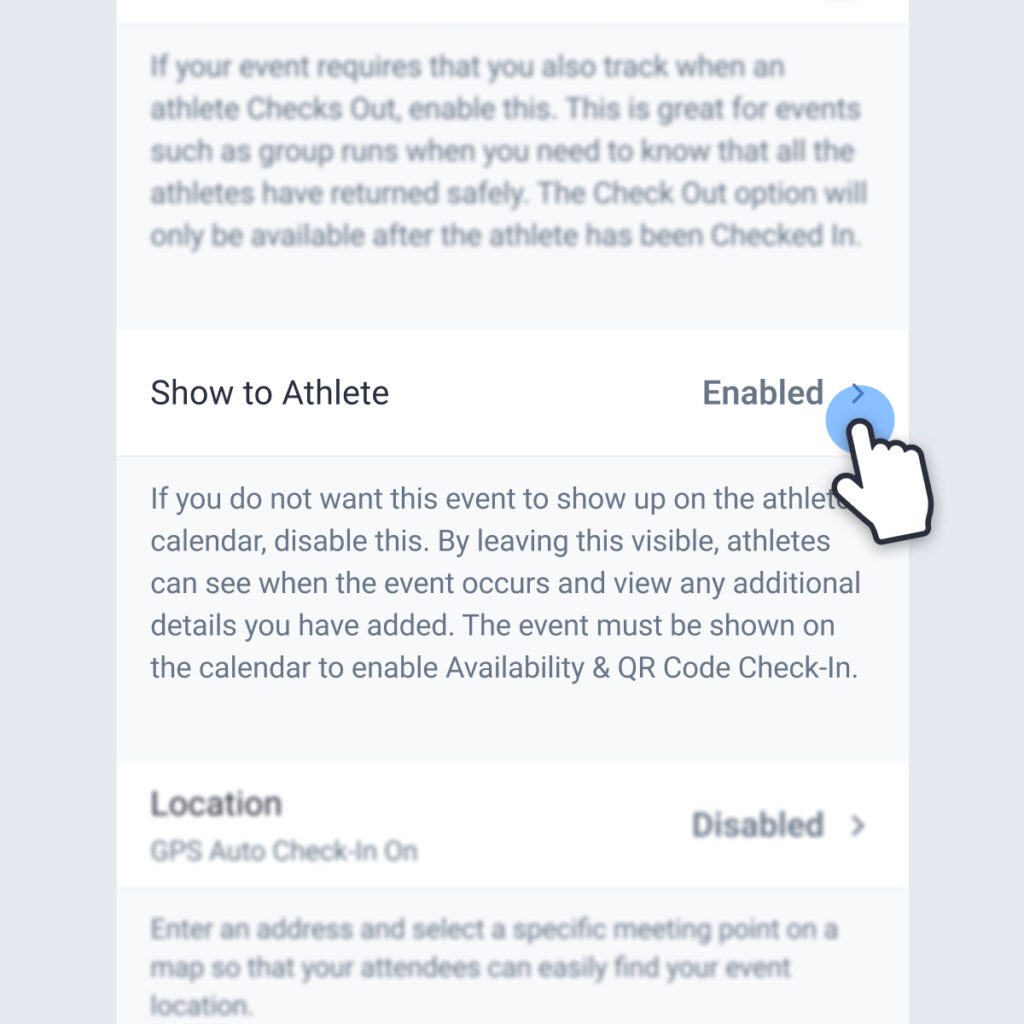
*Show to Athlete – this allows athletes to see the event and all of the event details (description, location, time, etc.) on their calendar. If you don’t want the event to show up for the athlete and you will be taking attendance manually, then leave this disabled. However, enabling this option and displaying it on the athlete’s calendar opens up additional options for coaches to use.
*The event must have “Show to Athlete” enabled to access these additional features:
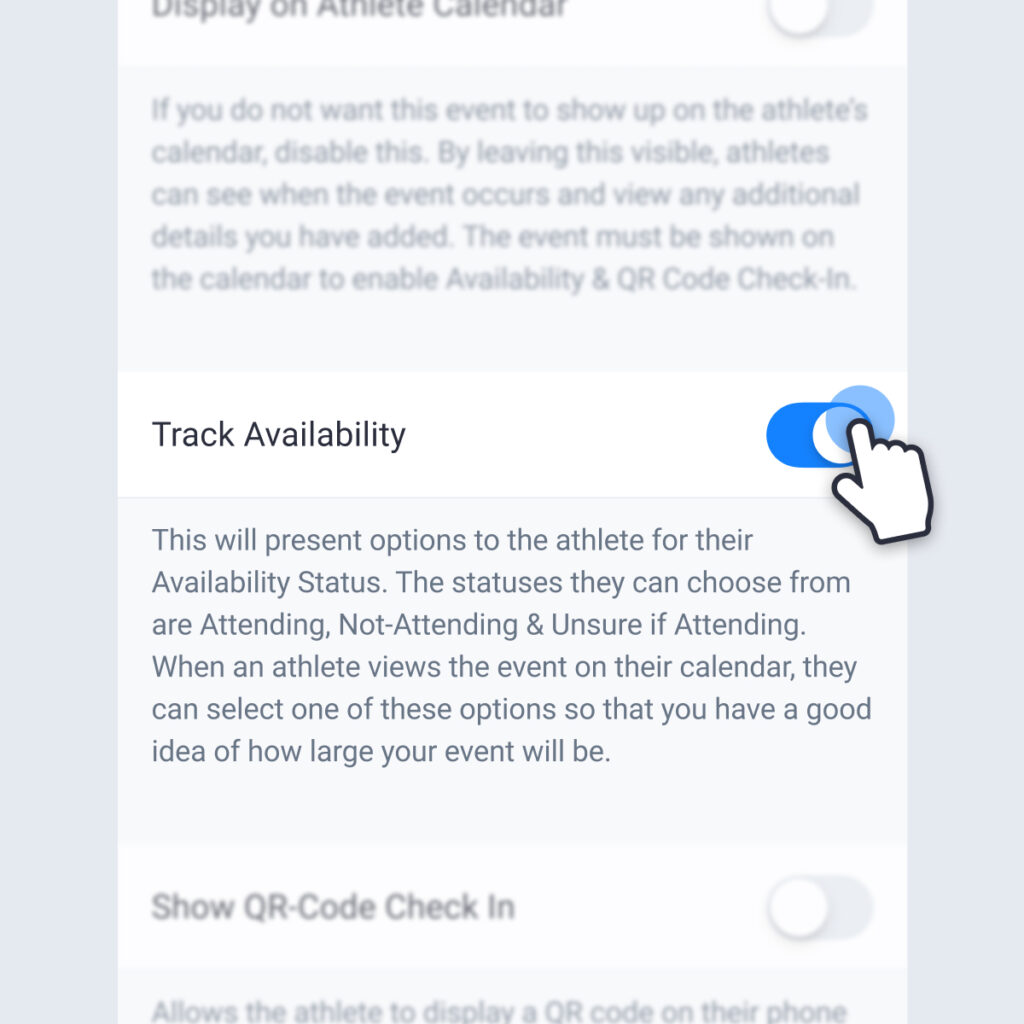
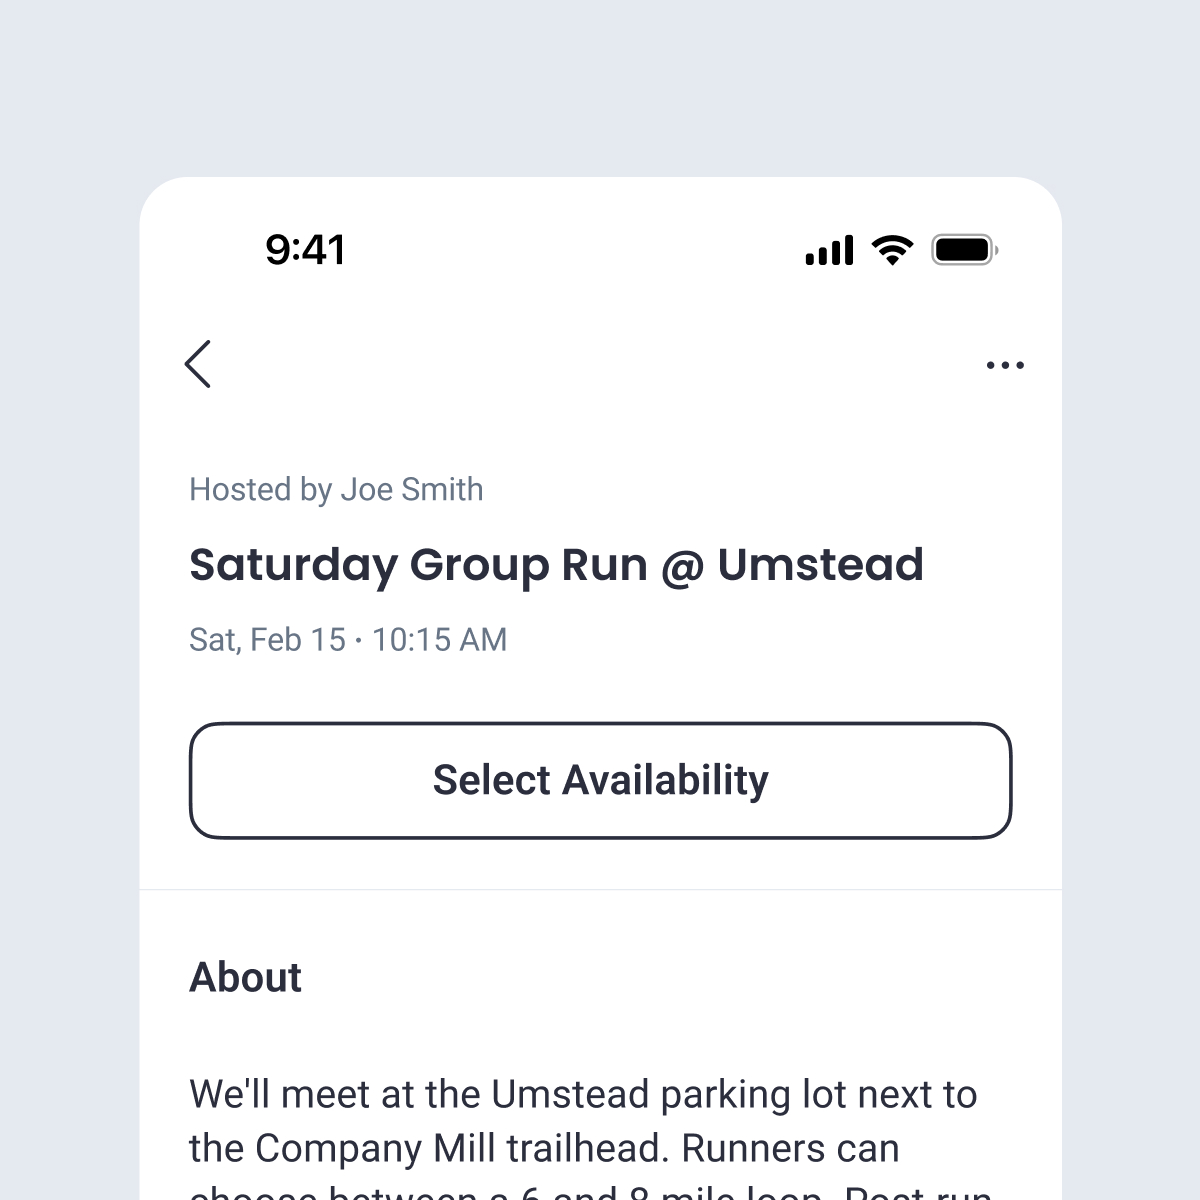
Track Availability – this allows an athlete to set their availability status before the event occurs to give coaches an idea of how many athletes will be participating. The statuses athletes can choose from are: Attending, Not Attending and Unsure if Attending. Athletes can tap on the event from their calendar to set this status.
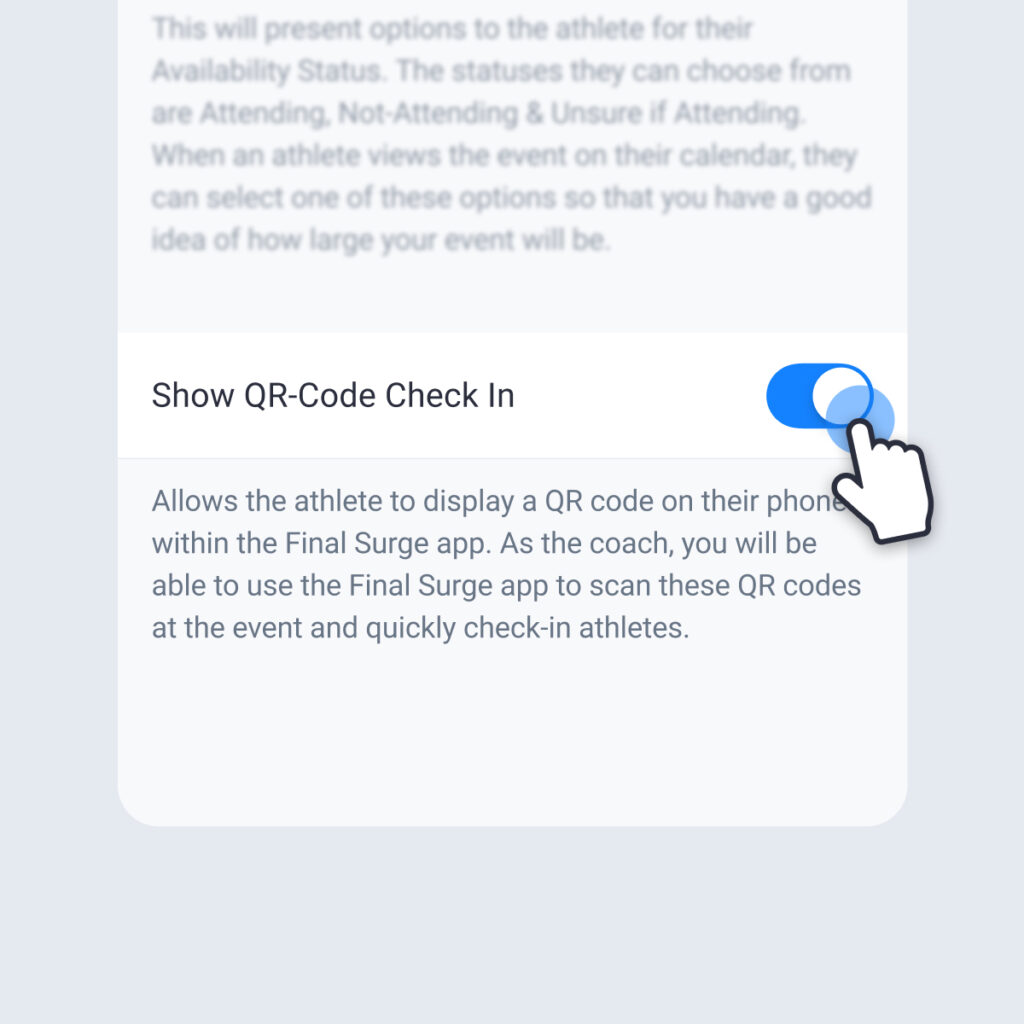
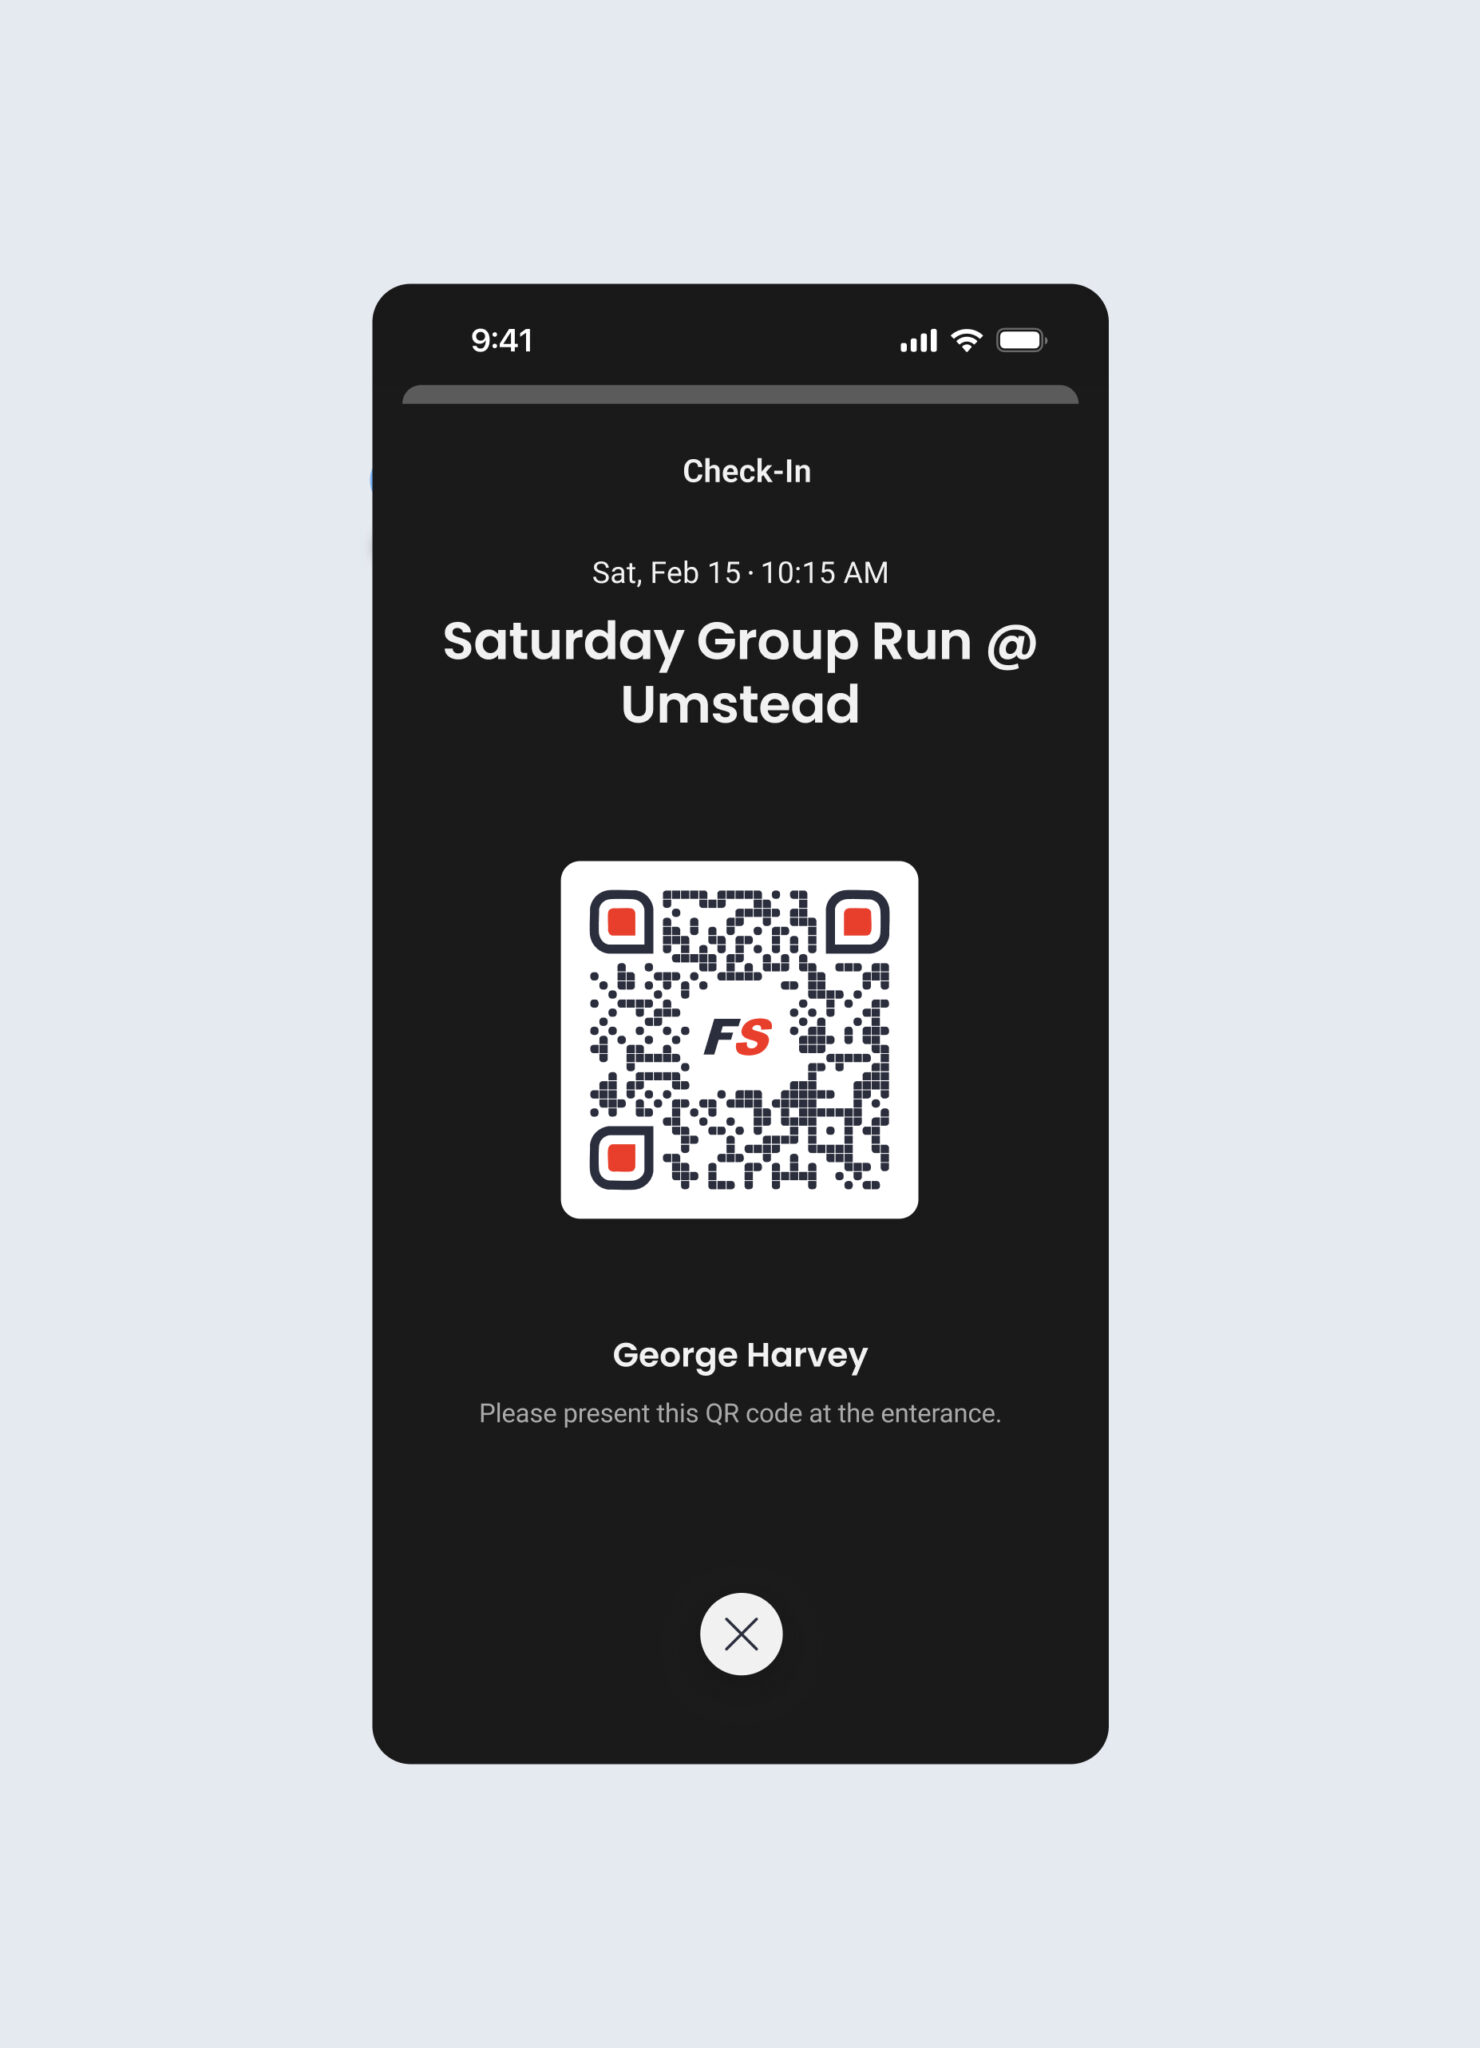
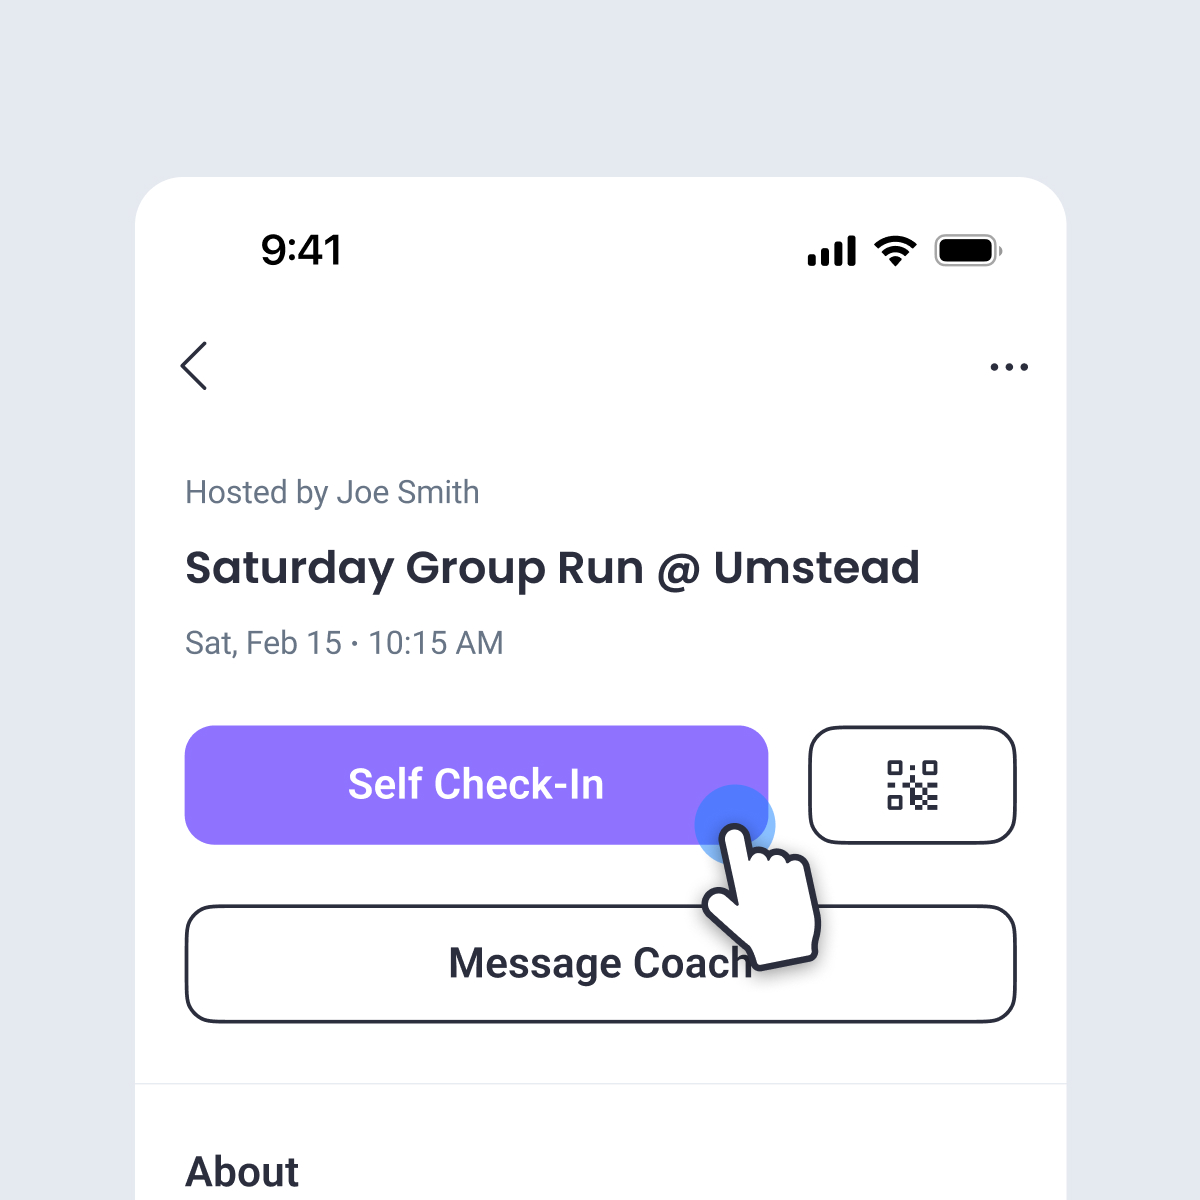
Show QR-Code Check In – enabling this allows the athlete to check-in using a QR code within the Final Surge app. Athletes will see the option to display the QR code when viewing the event, and coaches will see an option to Scan QR Code when checking athletes into the event using the Final Surge app on their phone.
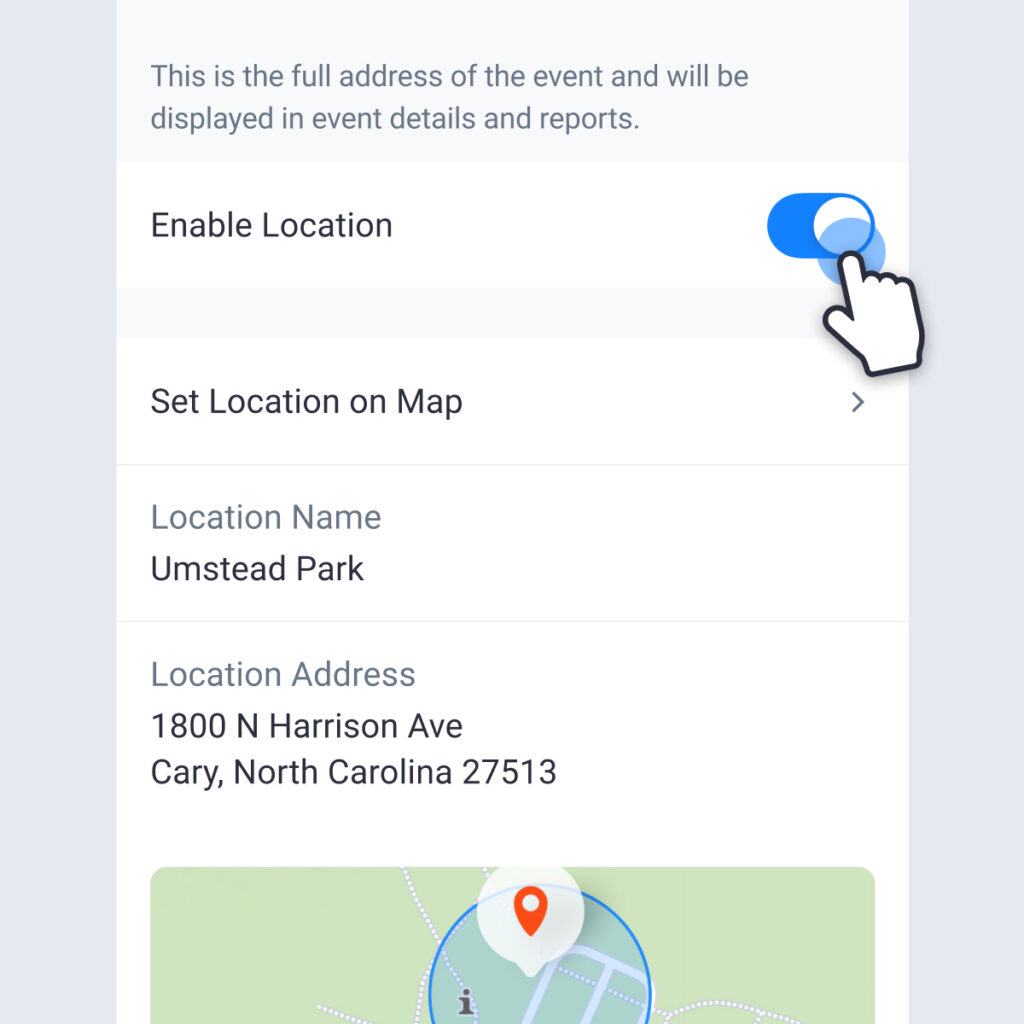
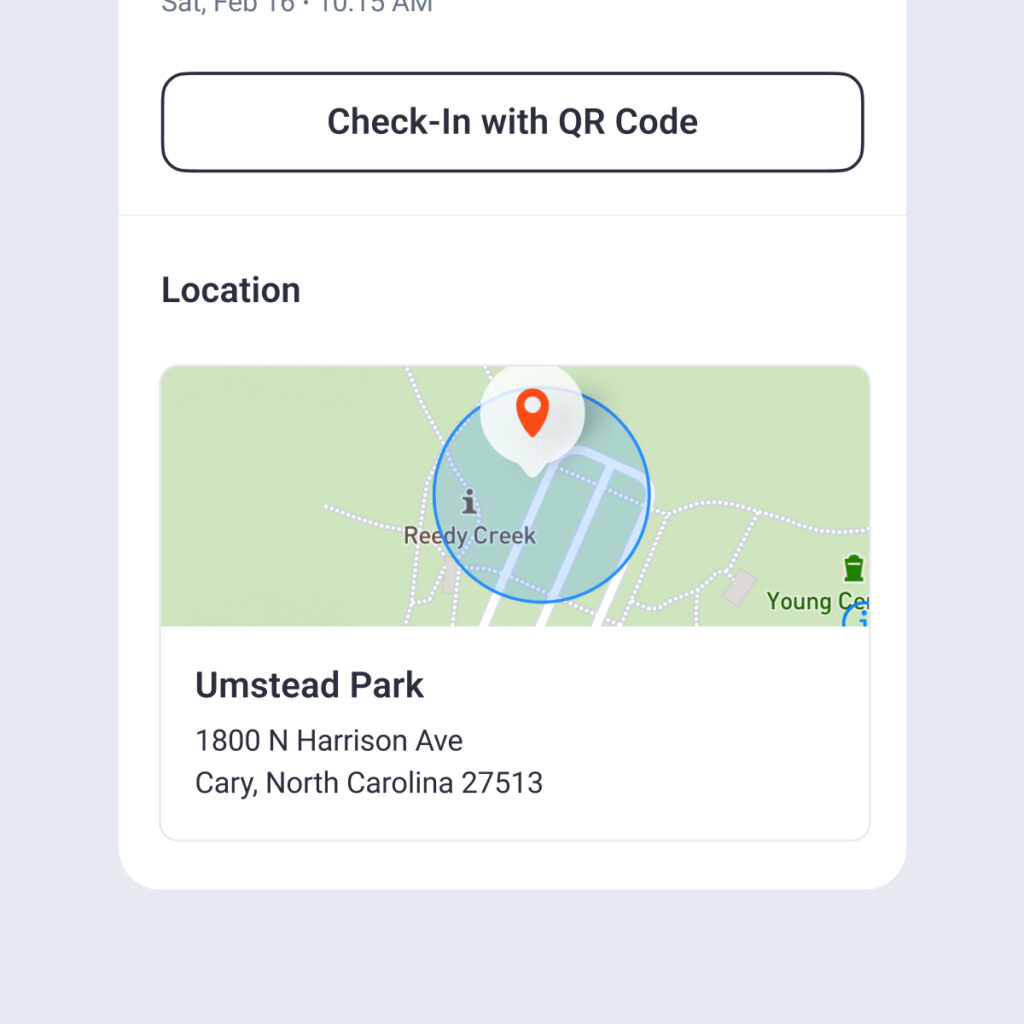
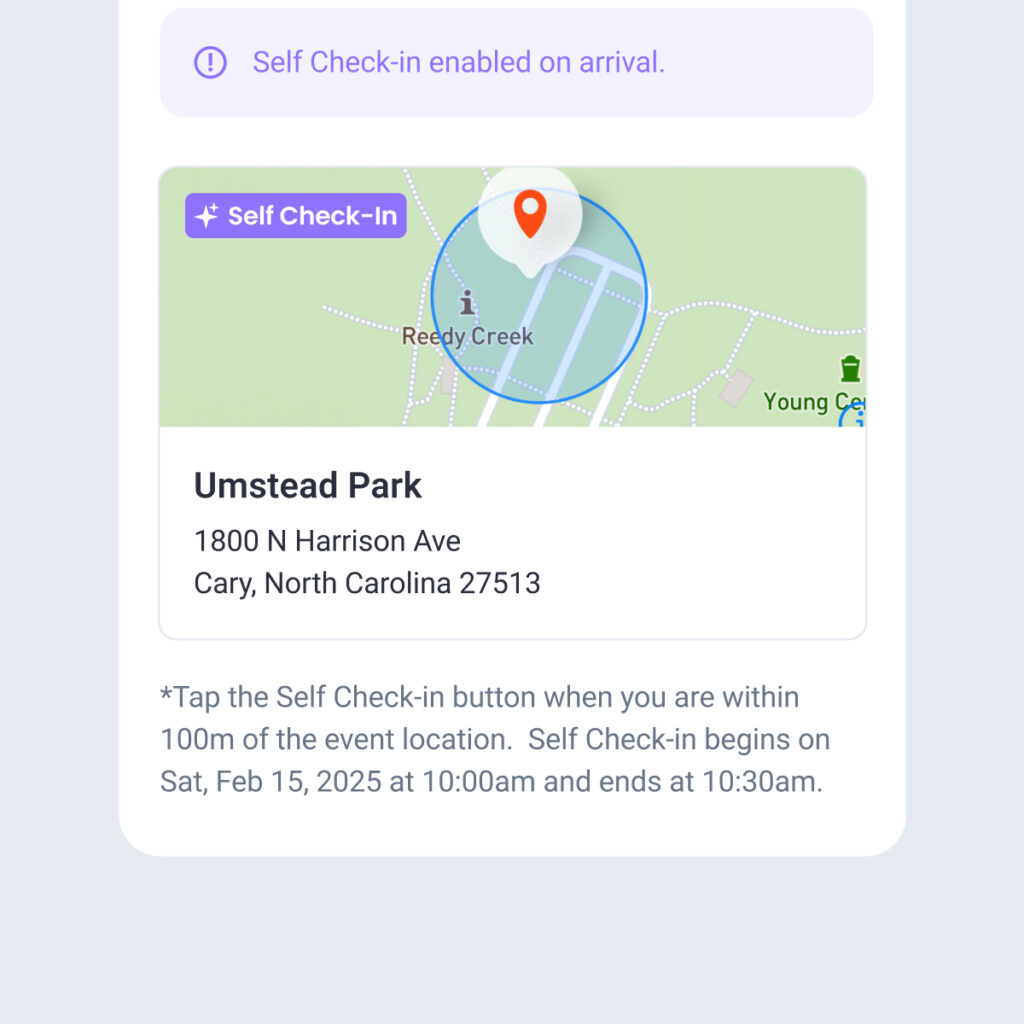
Location – allows you to enter an address and/or a specific location on a map of where you want the athletes to meet for the event. For the location you can enter a name and an address that will display to the athlete. In addition, you can select a specific location on a map (such as the corner of a parking lot) so that when athletes click on the location from the event details on their calendar, their mapping software (Google Maps, Apple Maps, etc.) will take them to the exact meeting spot.
Location Based Self Check-in – if you have selected a specific location or address, you can then enable Self Check-in for athletes. This allows an athlete to check themselves into the event when they are within a certain GPS radius of your meeting spot. If you use this feature, you will also be asked to enter the following information:
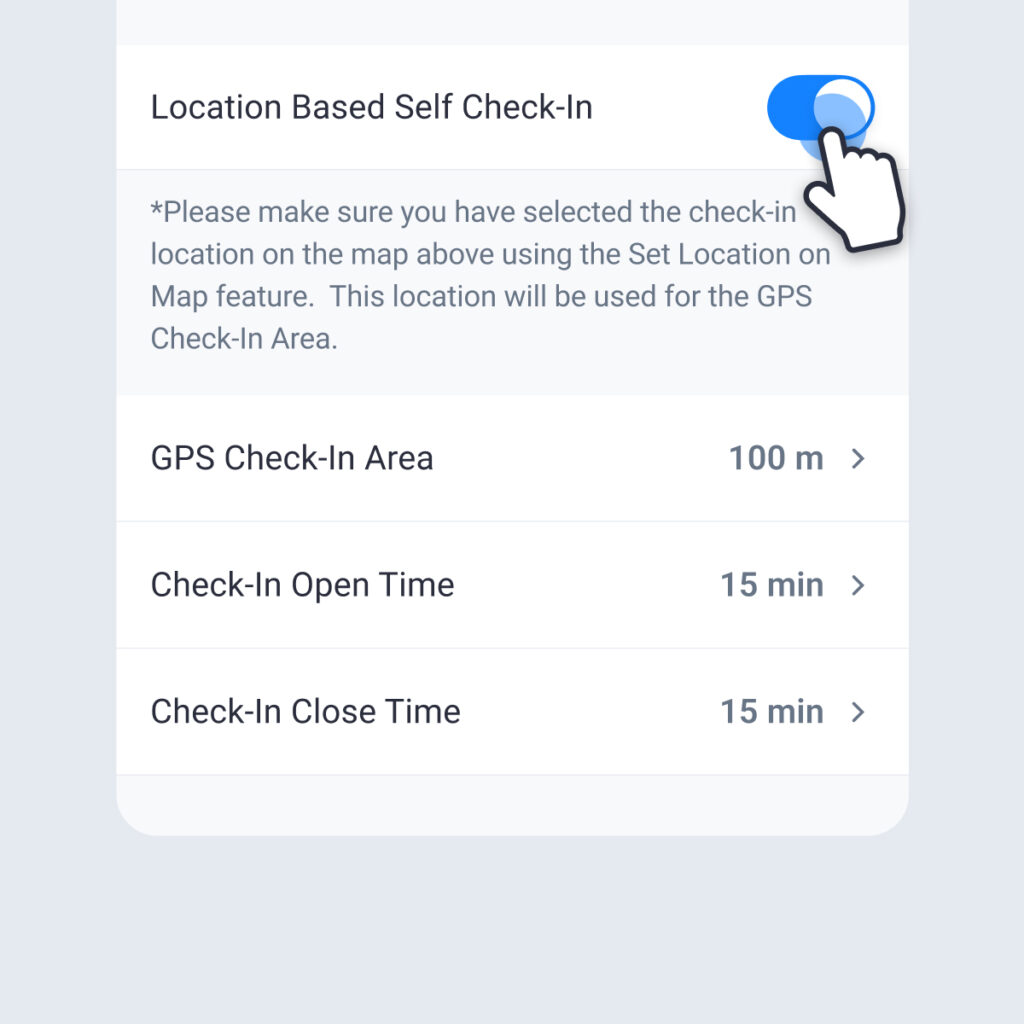
- GPS Check-in Area – the radius (in meters) that an athlete has to be within before Self Check-in is available for the athlete. You can choose between 25m and 400m for the radius. Once selected, you will see this shown on the location map.
- Check-In Open Time – how many minutes before the event starting time that Self Check-in is available. You can choose between 5 and 90 minutes.
- Check-In Close Time – how many minutes after the event starting time that Self Check-in is still available. you can choose between 5 and 90 minutes.
Enable Rewards – If you have created a Rewards Program within Final Surge, your athletes can earn reward points by attending and checking into an event. Use this section to select how many points an athlete will receive when they check-in.
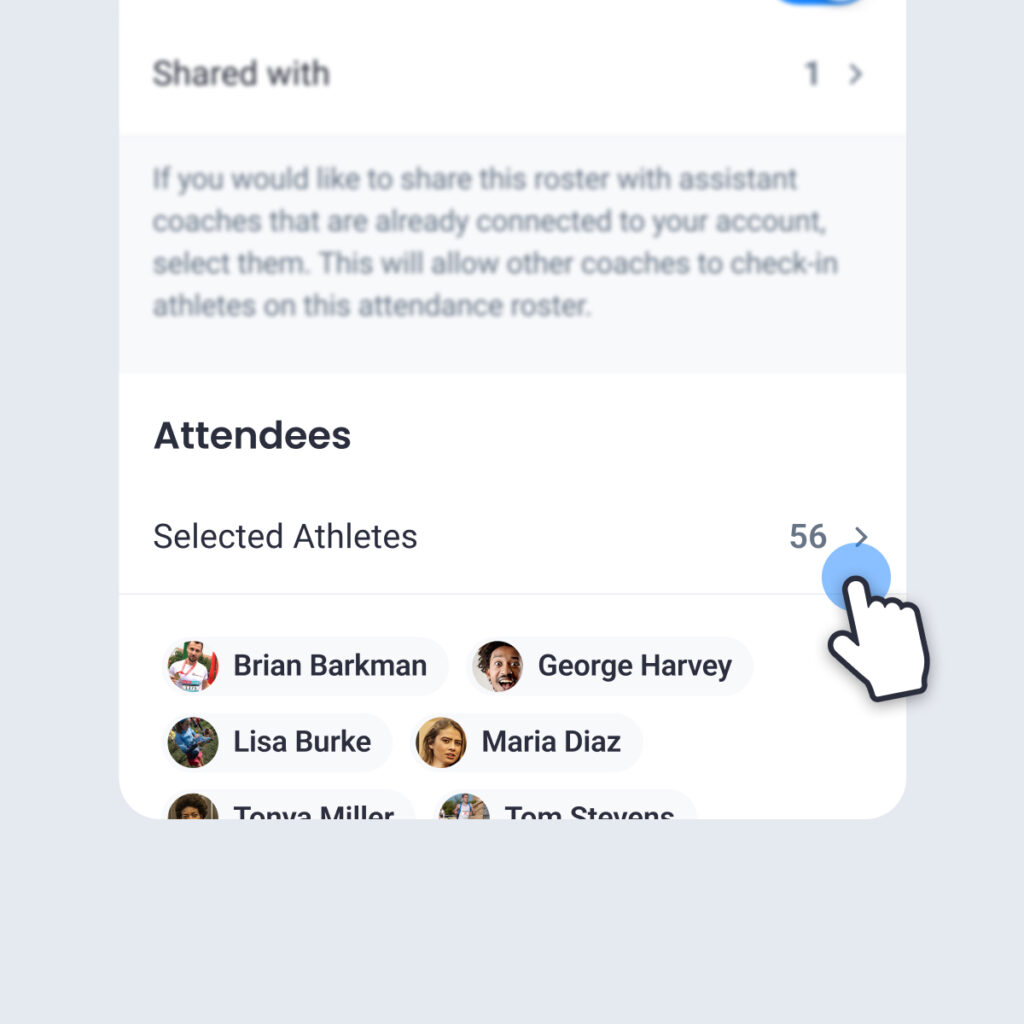
Once you have set up the details of the event, all that’s left is choosing what athletes or teams from your account will be attending the event.
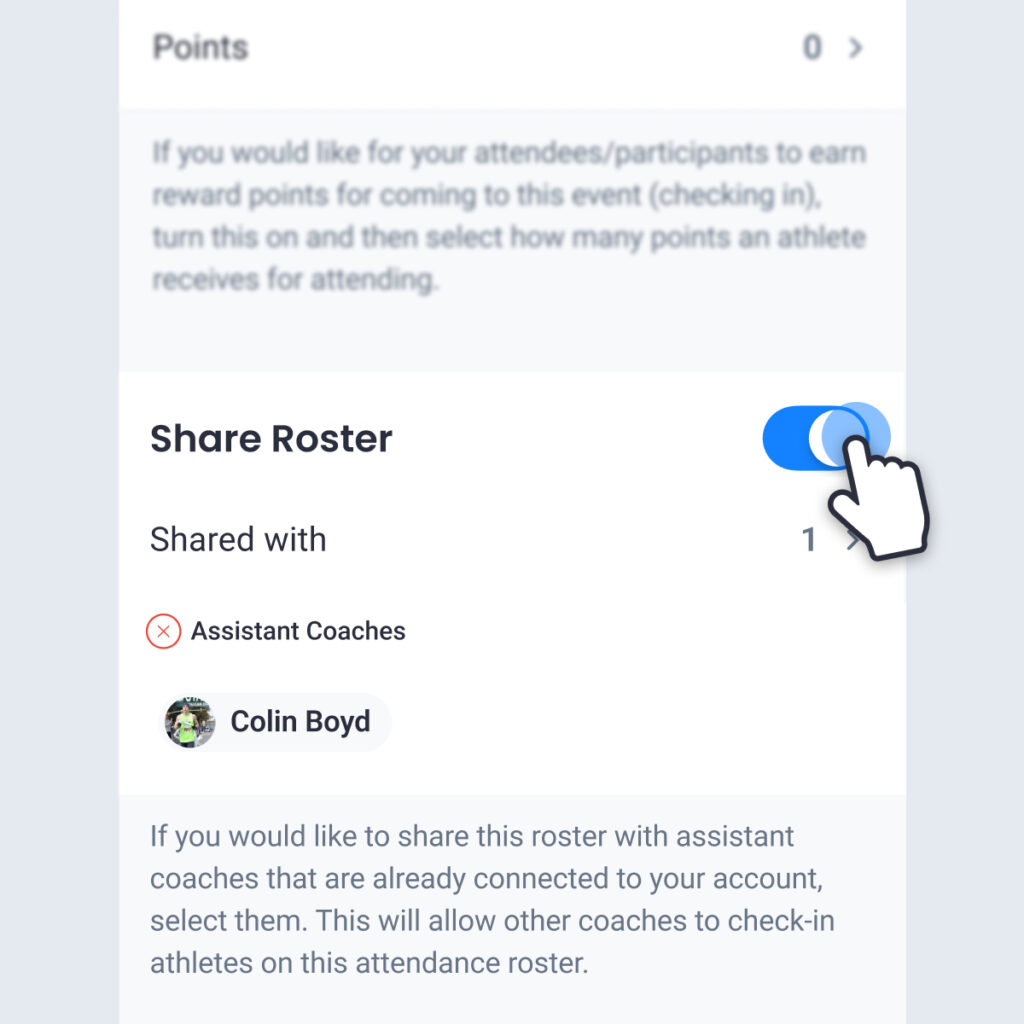
Share Roster – If you have assistant coaches that also need access to this event roster so that they can help check-in and check-out athletes, you can enable this and share the roster with any assistant coach that is already connected to your account.
Attendees – This allows you to choose what teams or athletes from your account will be attending the event. Only teams or athletes you have selected will see the event on their calendar (if you have enabled the “Show to Athlete” option) and will be able to check-in to the event.
Taking Attendance & Checking-In Athletes
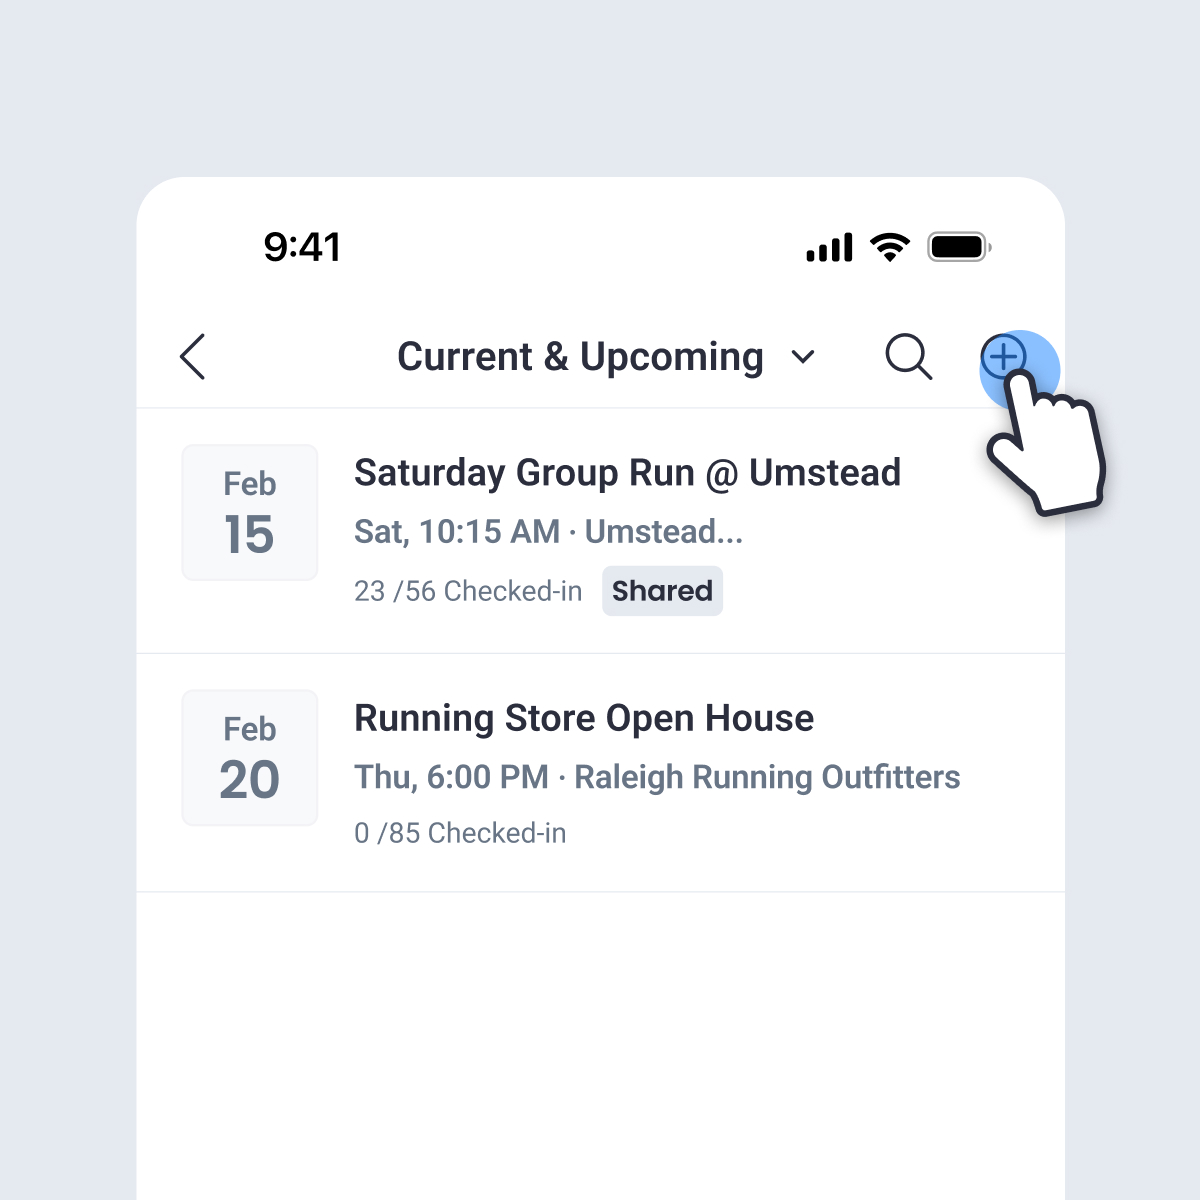
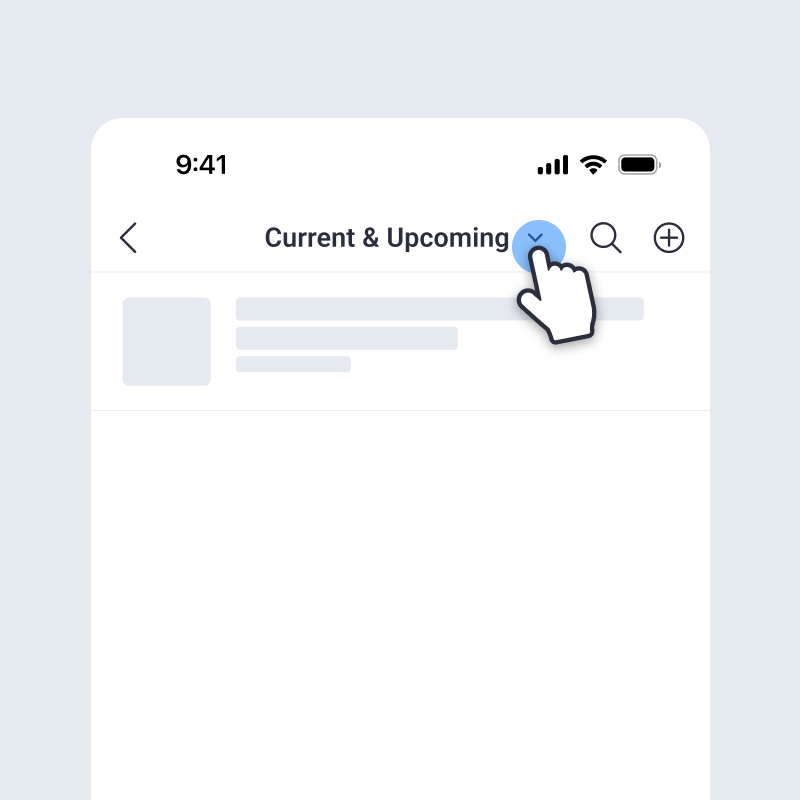
To take attendance for an event, navigate to the Attendance Rosters link from the More menu in the Final Surge app. The screen will default to Current & Upcoming events. You can tap the dropdown menu at the top to switch your view to Past Attendance Rosters to view events that have already been completed.
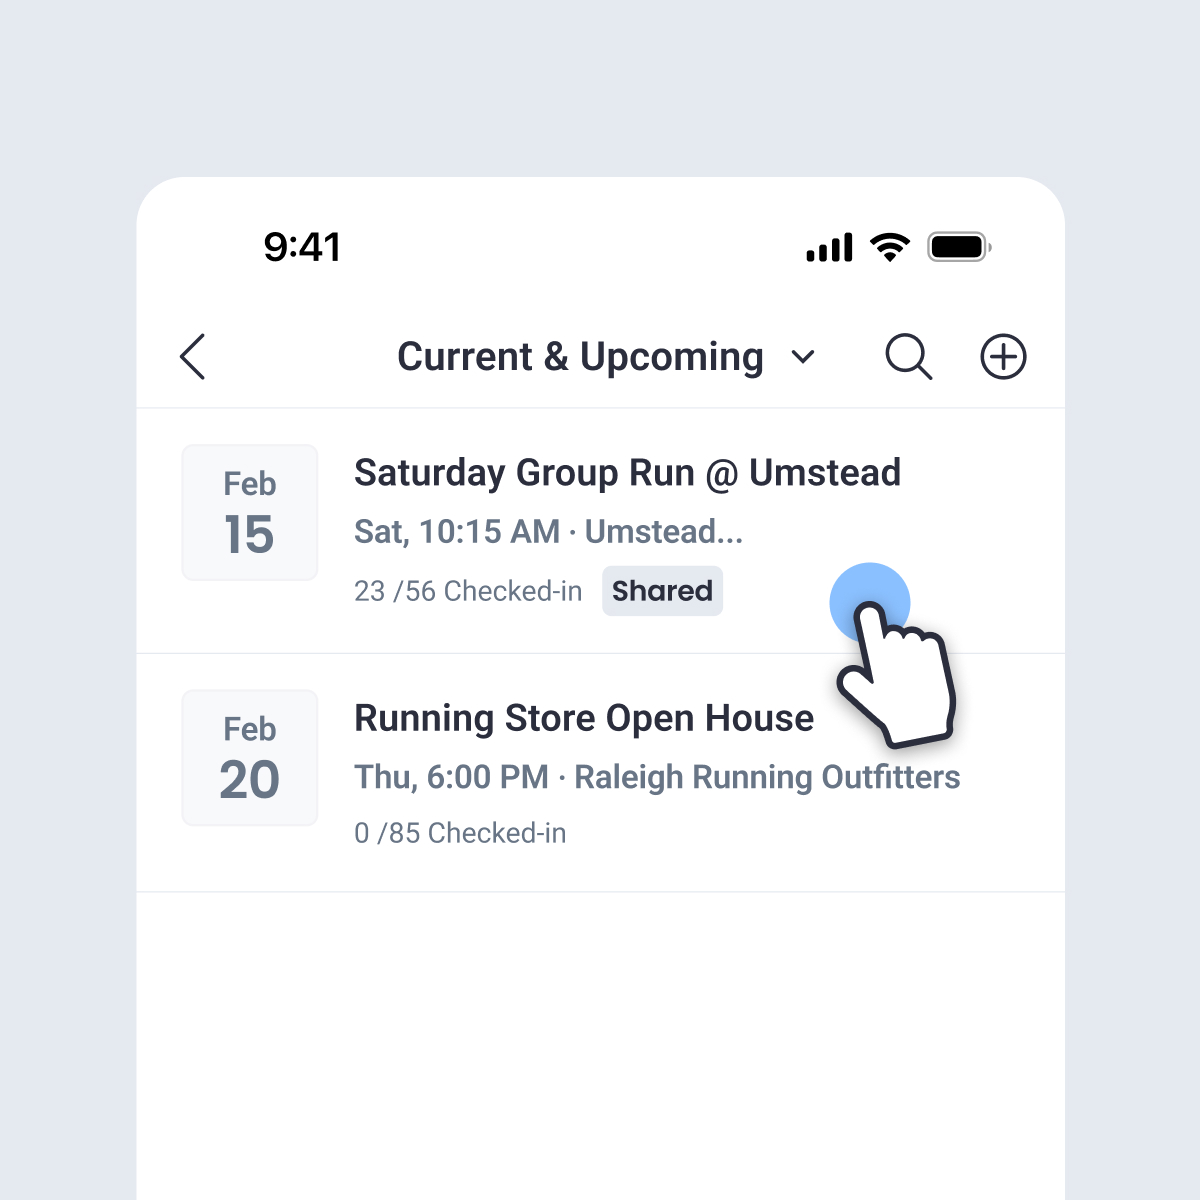
From the Current & Upcoming event list, tap the event that you want to view. This screen will show you a summary of the event, including an Availability report if you had enabled that feature when setting up the event.
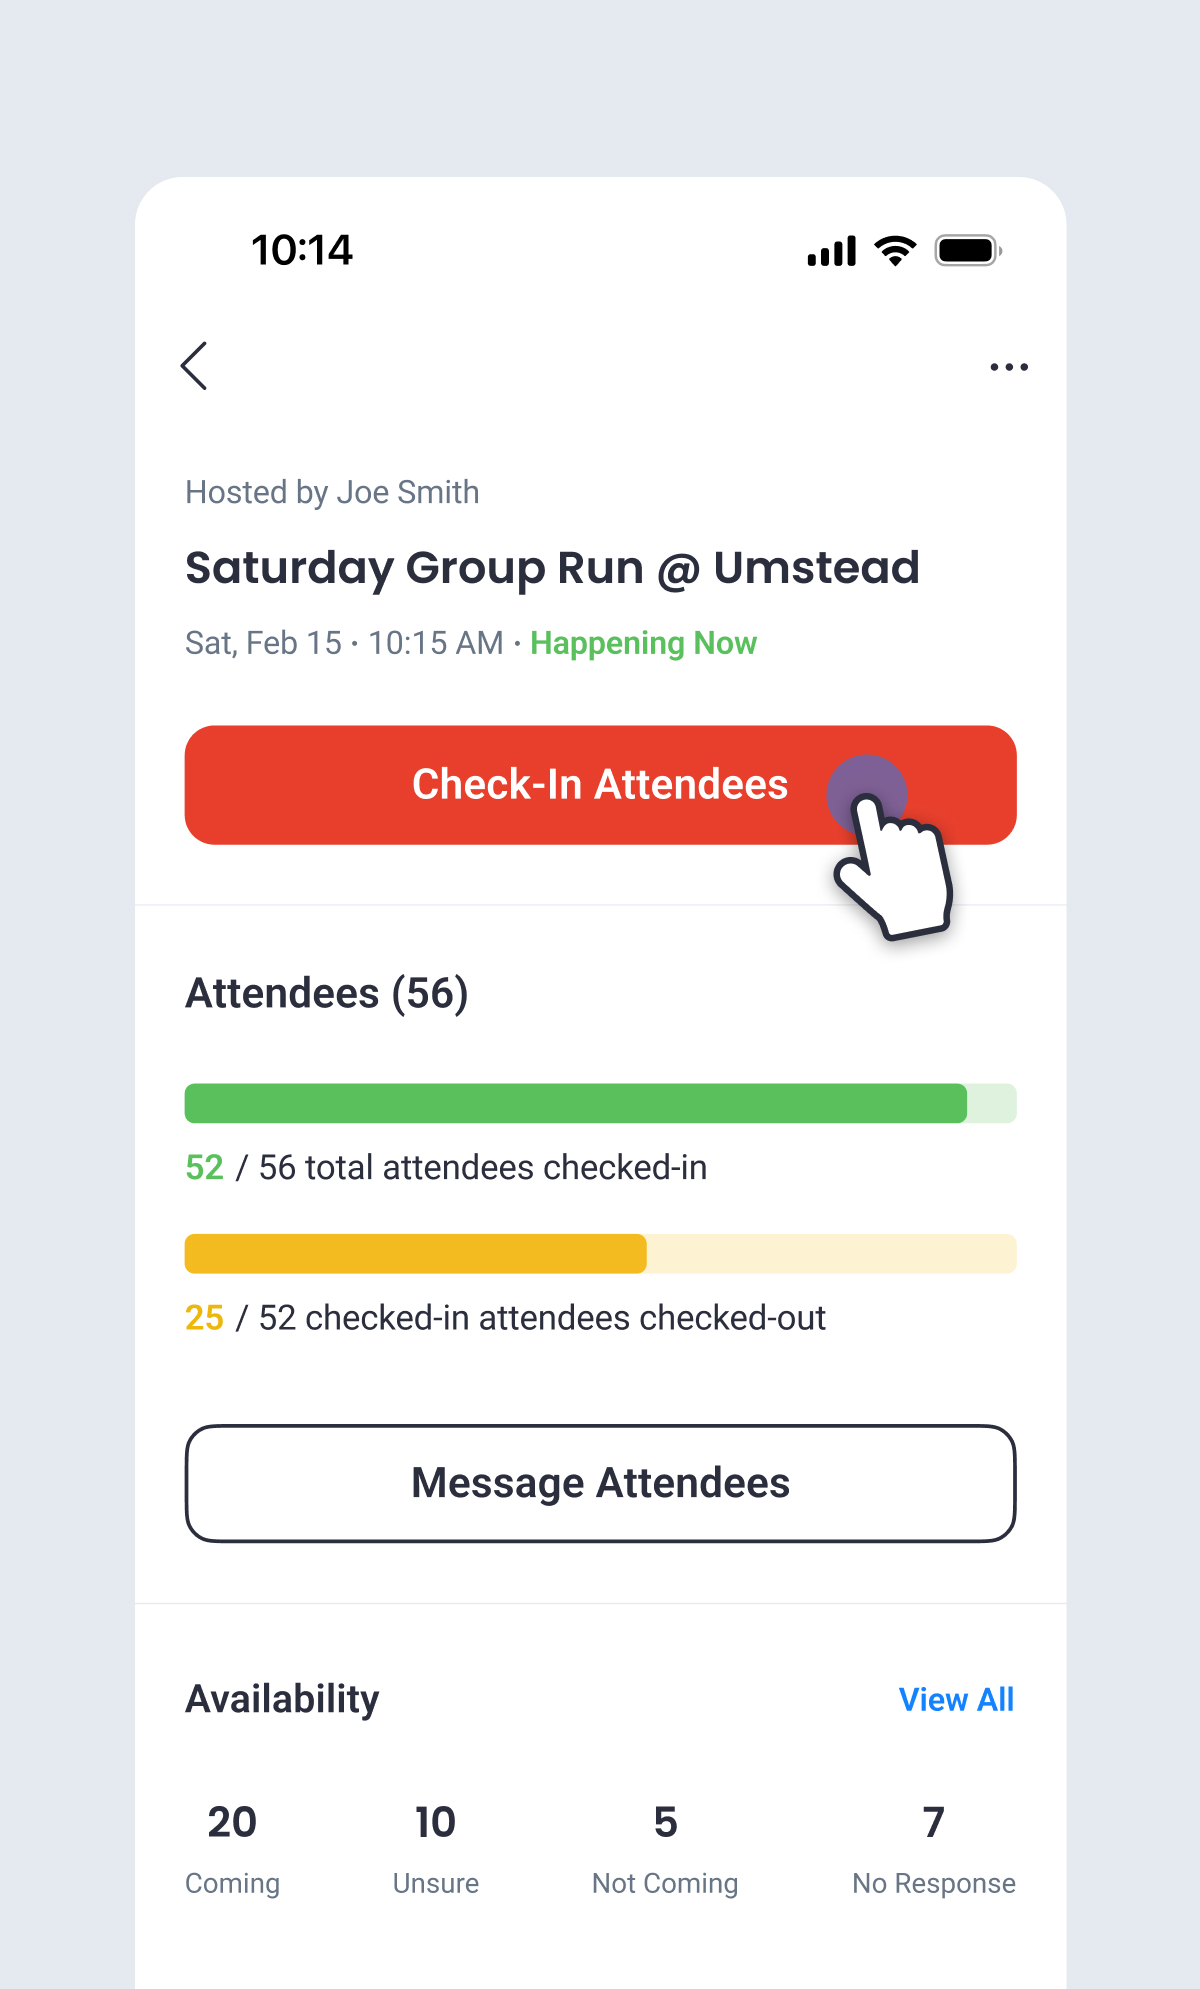
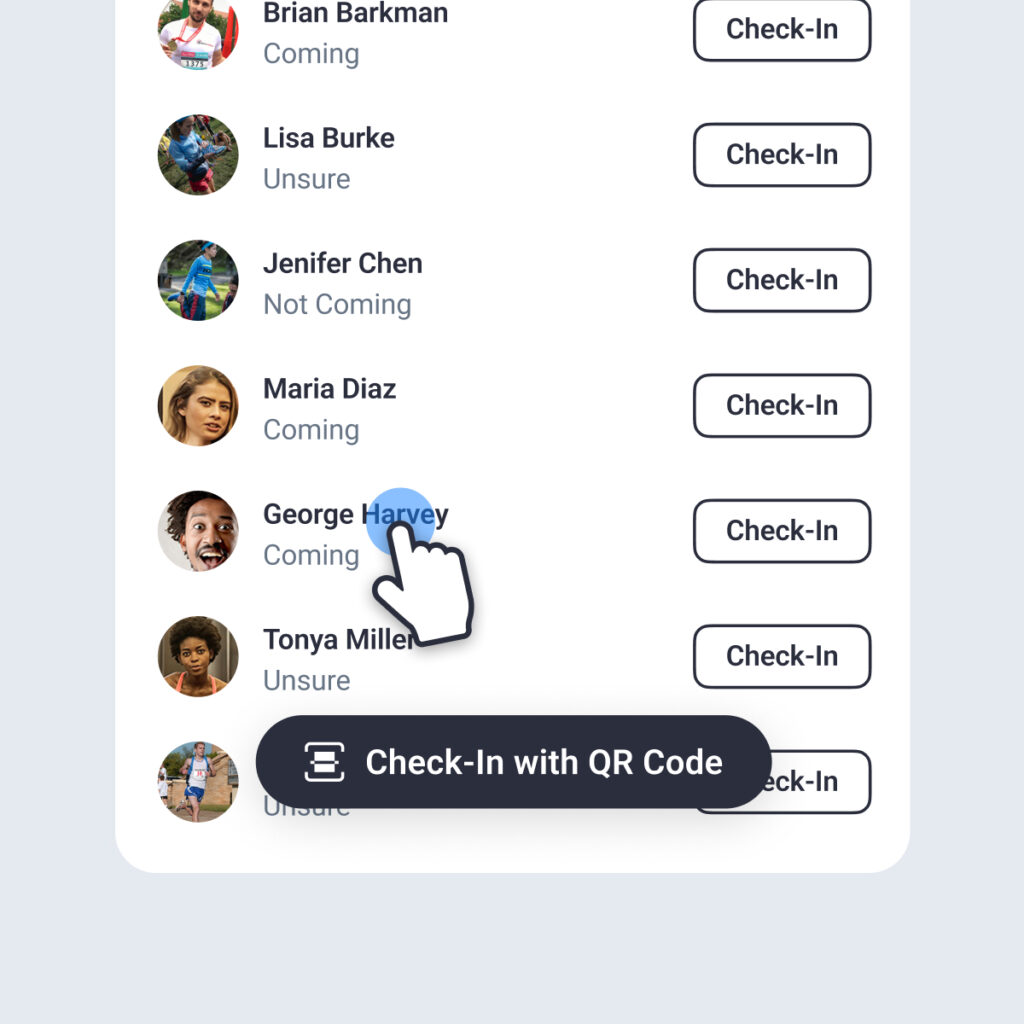
To begin checking-in athletes, tap the “Check-In Attendees” button on this screen. You will then see a list of all athletes that have not yet checked-in. You can simply tap the “Check-In” button to the right of athlete to manually check them in to the event.
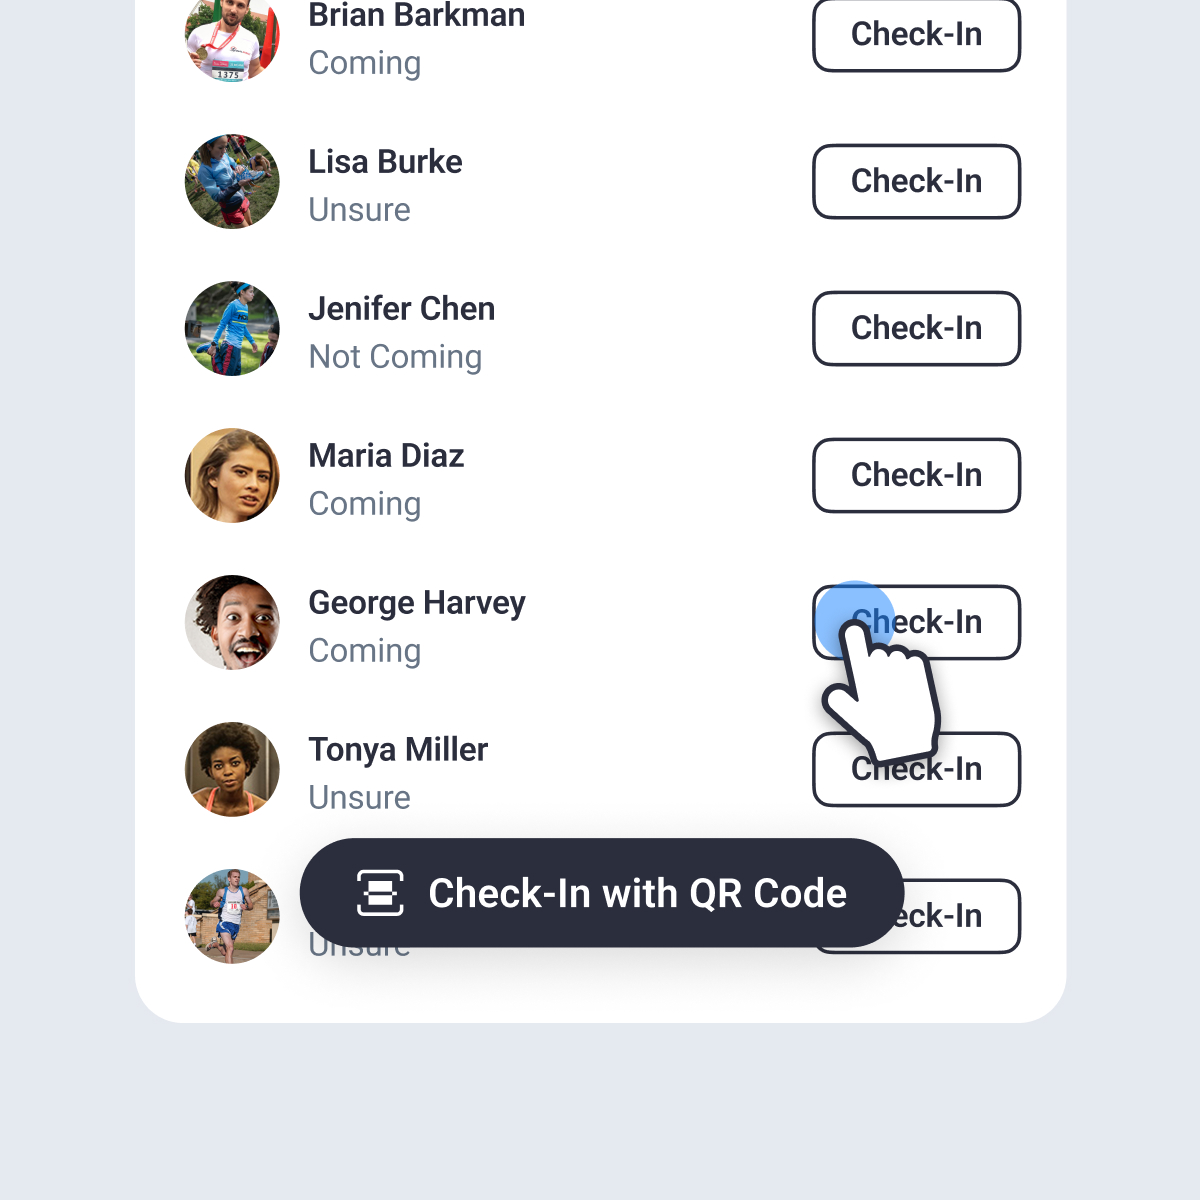
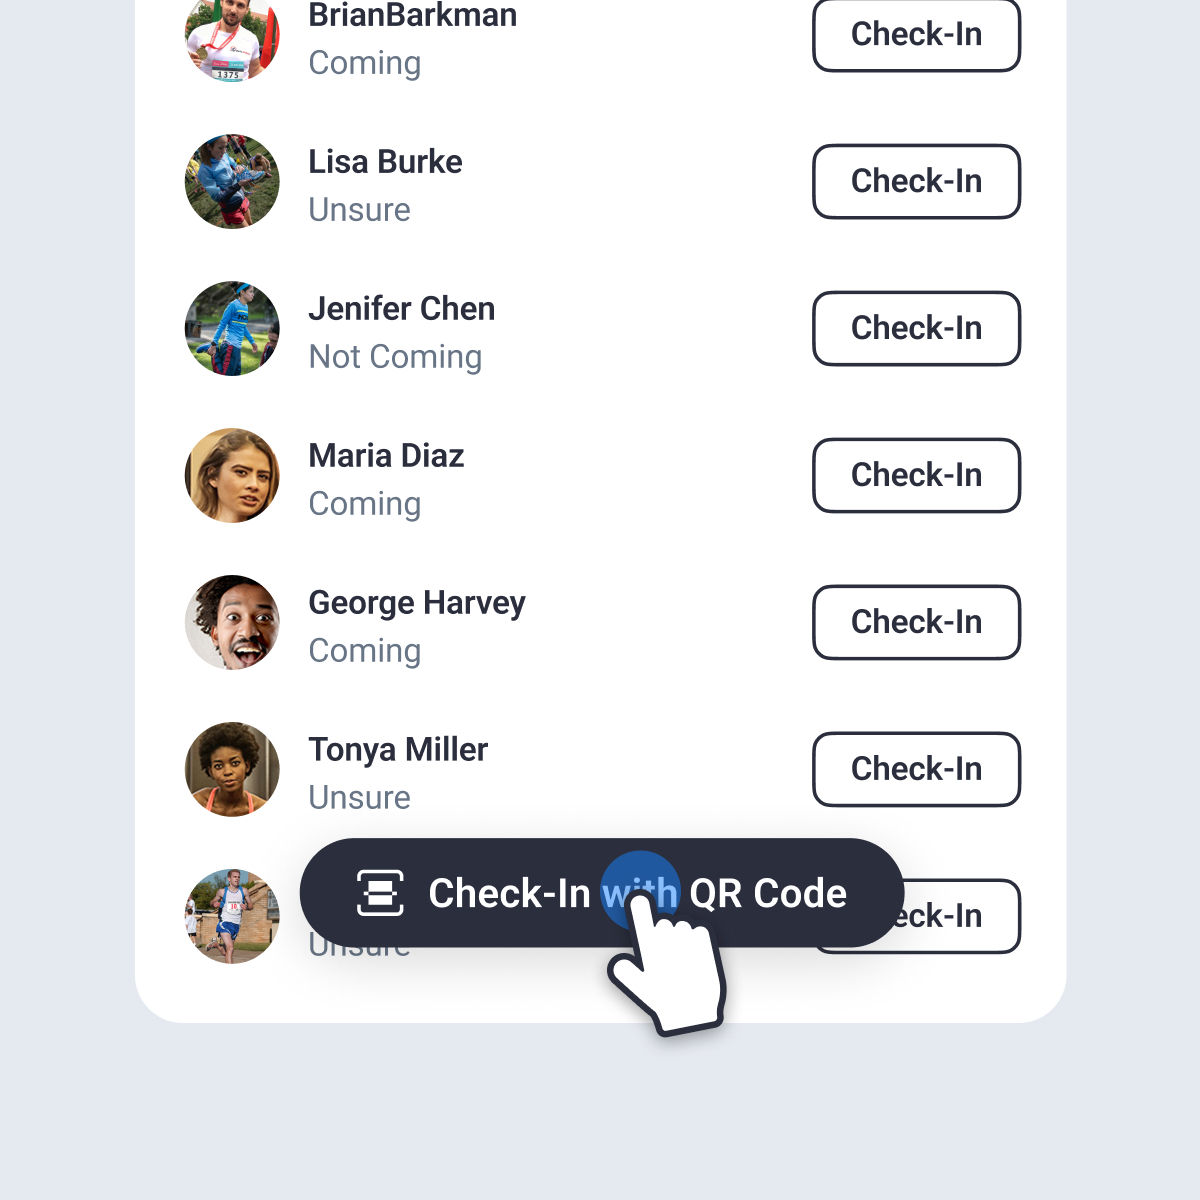
If you have enabled the QR Code check-in option, tap the “Check-In with QR Code” button at the bottom of this screen. The scanner on your phone’s camera will open within the app, and you can begin scanning QR codes that are displayed to each athlete when they tap on the event from their calendar.
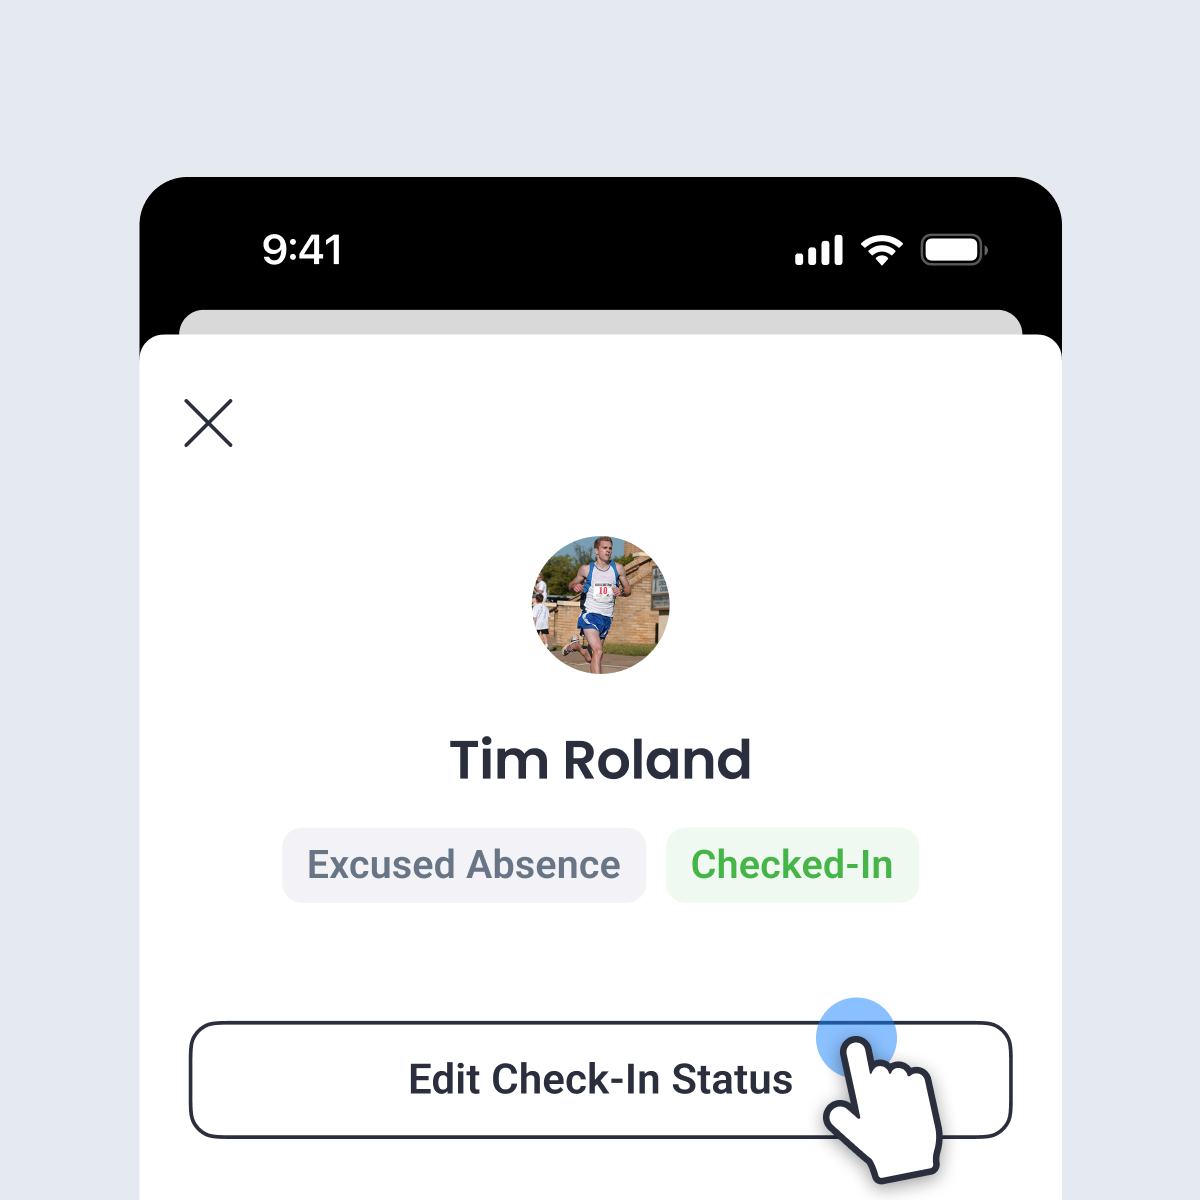
You can also tap on an athlete’s name in this list to edit this athlete’s attendance record. You can reset their Check-In Status, edit their Availability Status, and enter both Public and Private Notes about their attendance. By editing the athlete’s Check-In Status, you can also mark them as “Absent” or set the status to “Excused Absence”.
Allowing Athletes to Self Check-In
If you enabled the Self Check-In option for the event, your athletes will see a “Self-Check In” button on the event details page from their calendar. By tapping this button, the app will check to ensure the Check-In Open time has begun and the Check-In Closed time has not yet passed. In addition, the athlete must be within the GPS Location radius you set up for the event. When those conditions are met, the athlete will be checked-in when they tap this button.
Adding a Guest to the Attendance Roster
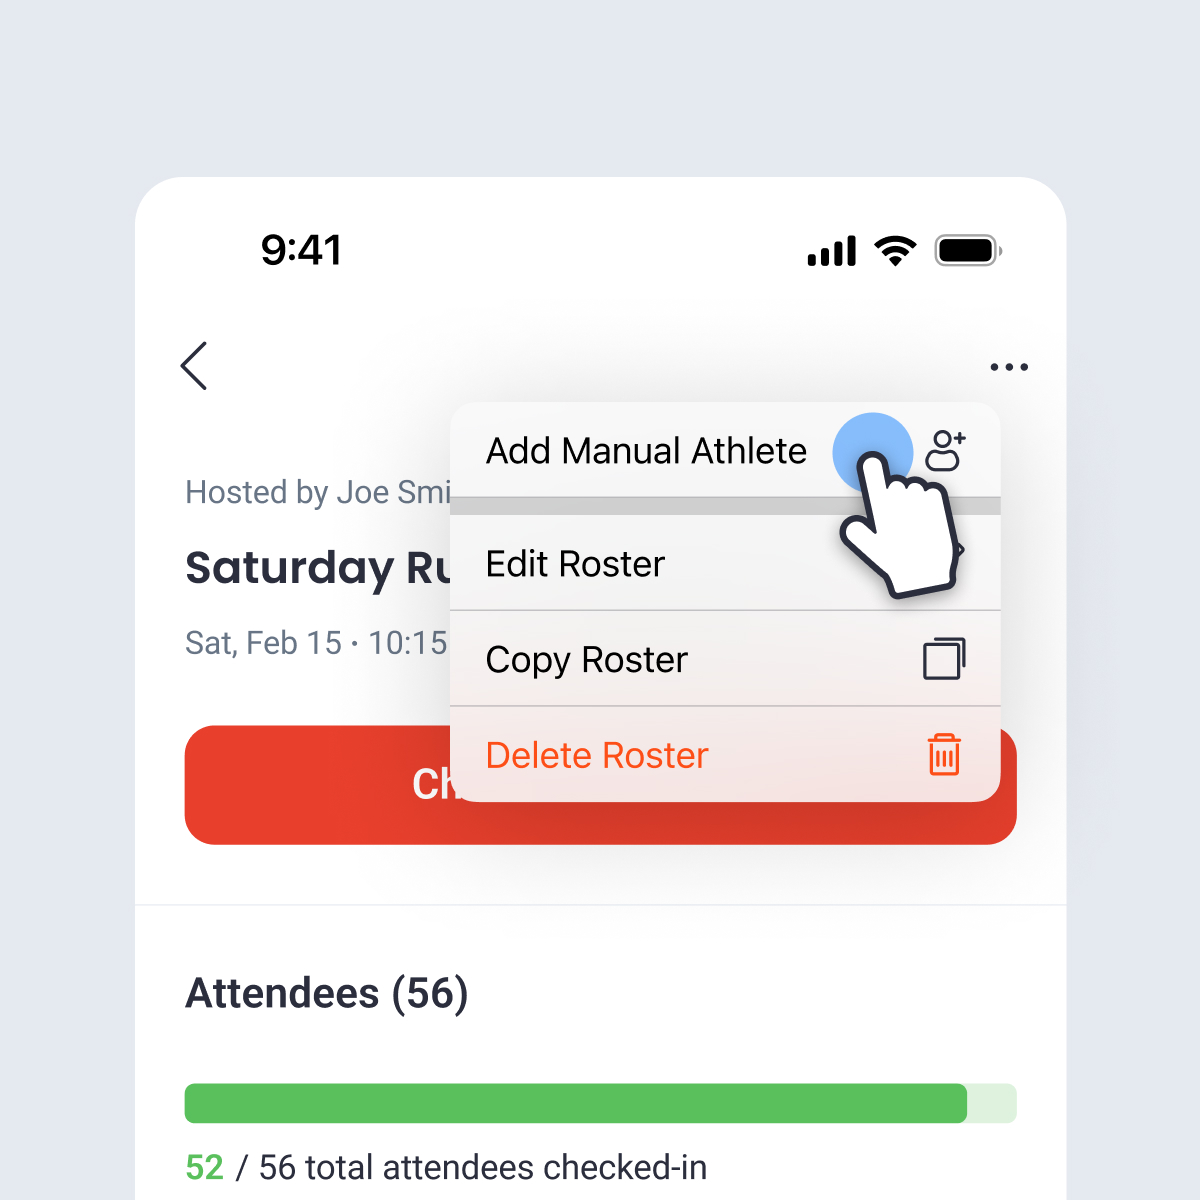
If you have an athlete show up for an event who does not have a Final Surge account or was not part of the selected attendance roster, you can add a “Manual Athlete” at any time so that you have a record of their attendance. From the Check-In Attendees screen, tap the plus [+] icon in the top right corner and select “Add Manual Athlete”.
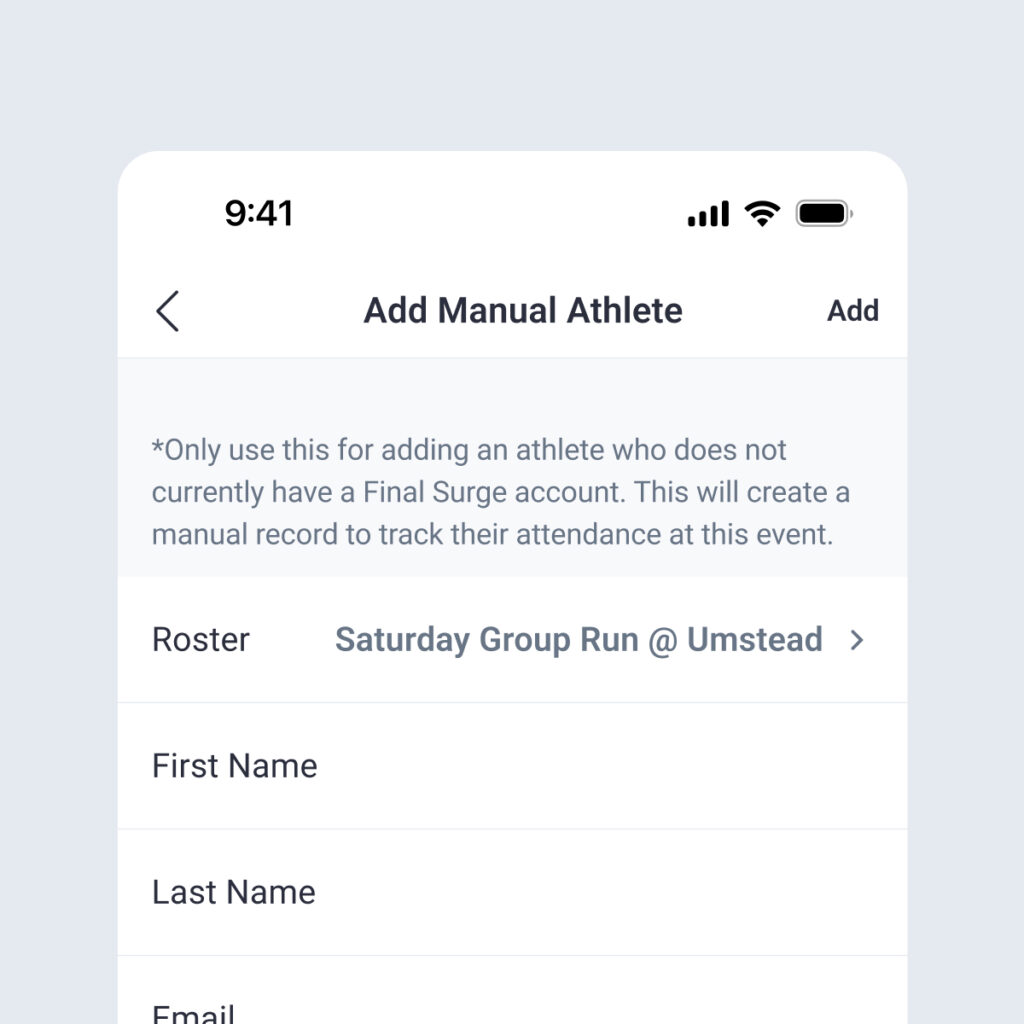
You can then enter as much information about this guest participant as you want including Name, Email, Check-In Status, Availability, and Public and Private notes.
Checking-Out Athletes
If you have enabled the Check-Out feature, navigate to the “Checked-In” tab on the attendee list screen. You can manually check-out athletes by tapping the “Check-Out” button to the right of their name.
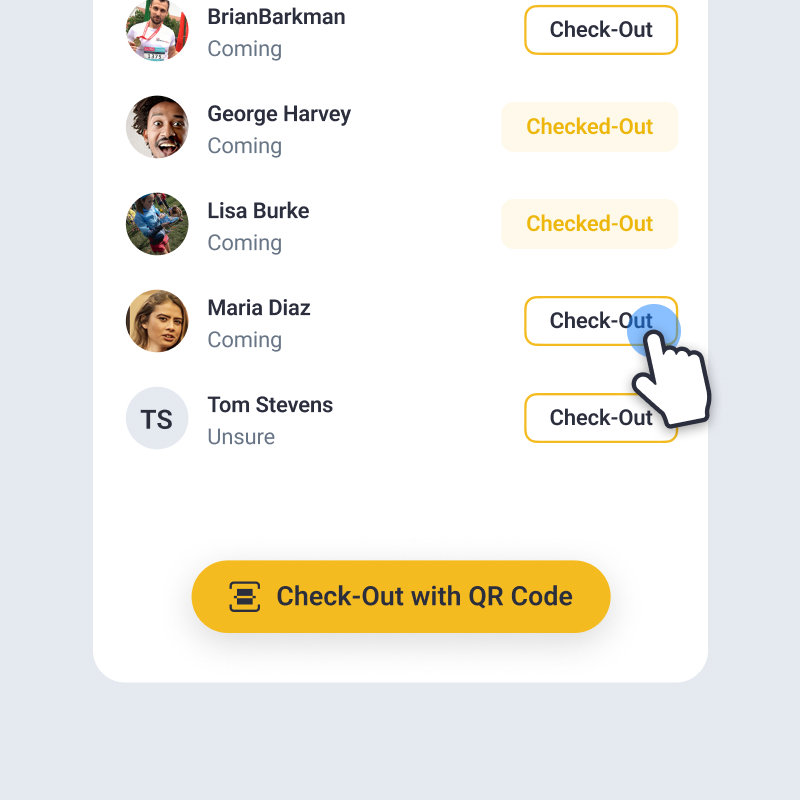
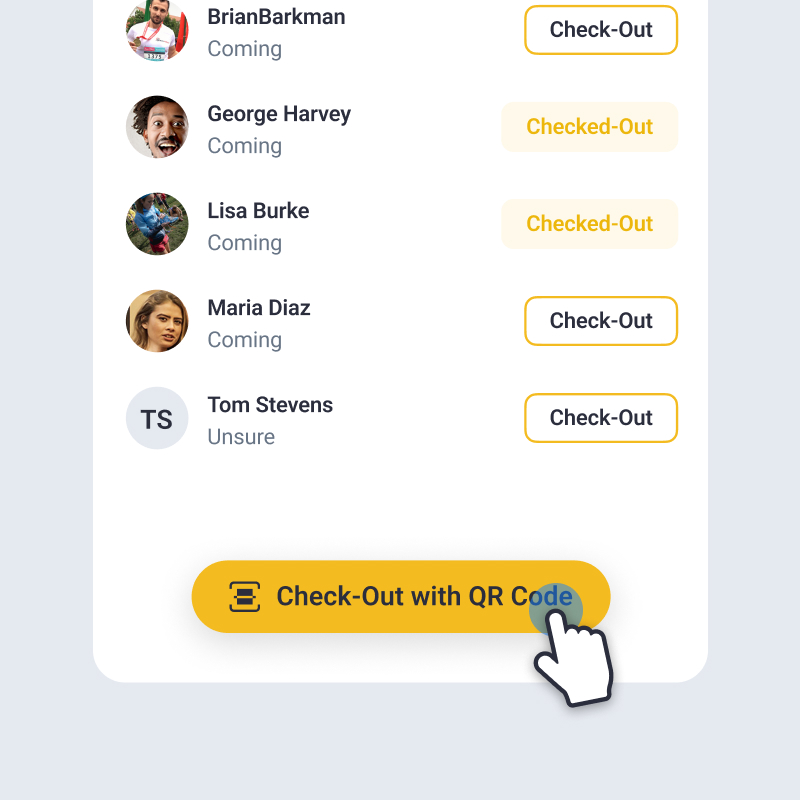
You can also utilize the QR Code check-out option by tapping the “Check-Out with QR Code” button at the bottom of this screen. Only athletes that have already been checked-in will be able to check out.
Messaging Athletes Before, During or After the Event
If you need to quickly message some or all of the athletes attending the event, you can do so through the Attendance Roster detail screens. On the main details screen, the “Message Attendees” button will allow you to send a Mailbox message to All Attendees, Checked-In Attendees, or Attendees who have Not Checked-In.
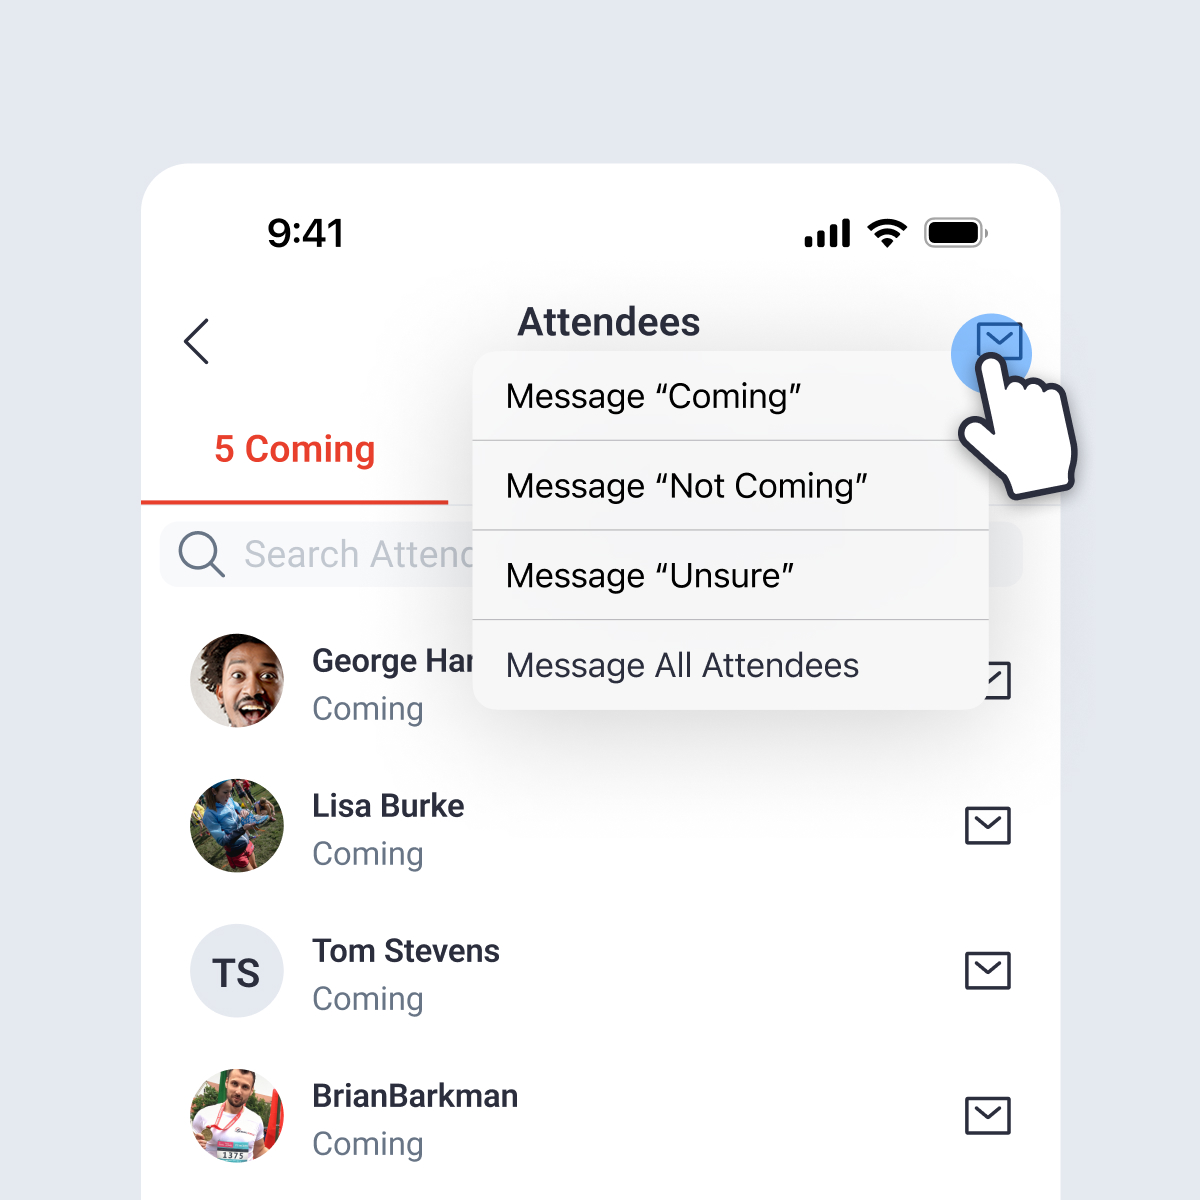
On the Availability Summary screen, tap the Mailbox icon in the top right corner to send a message to all participants, or to those who said they are “Coming”, “Not Coming”, or are “Unsure” if they are attending.
Editing/Copying/Deleting Your Attendance Roster
At any time you can edit the event details and adjust the roster of athletes you’ve chosen for this event. From the event details screen, tap the triple dots […] in the top right corner and select “Edit Roster”. You can then edit all of the details of the event, and also add and remove teams and athletes on this roster by scrolling to the bottom and adjusting the Attendees section.
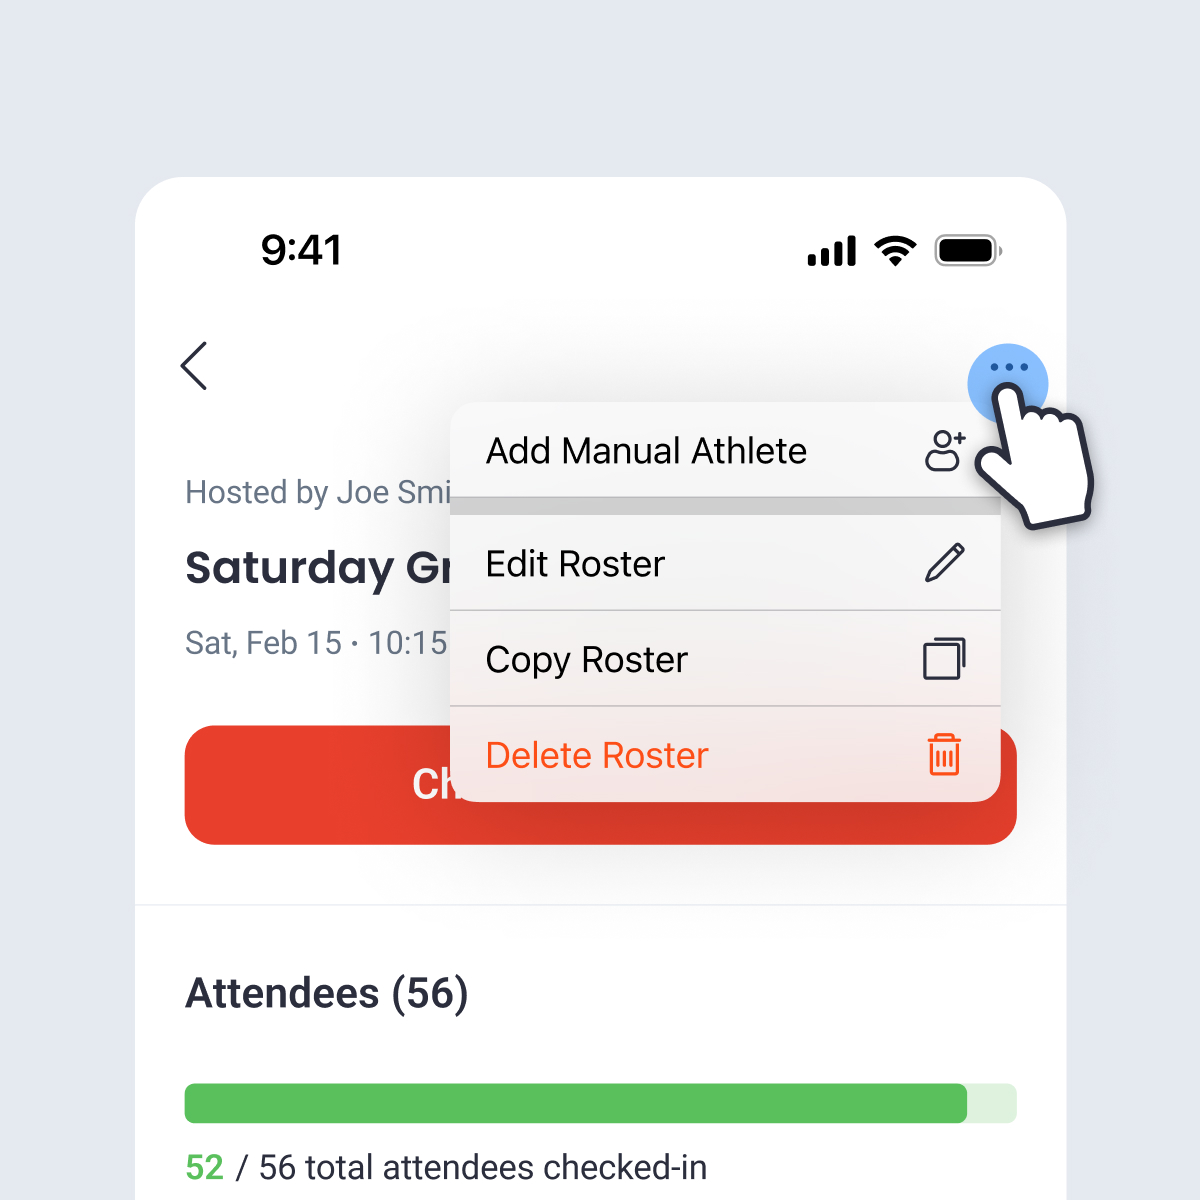
From this same triple dots […] menu, you can also choose to make a copy of the roster and copy all details of the event, including all attendees. Simply rename the event and choose a new date to copy it.
If you need to delete an event, use the same triple dots […] menu and select the “Delete Roster” option.
Once an event is over, it will be moved to the Past Rosters listing within the main Attendance Roster screen. You can go back to old events at any time, view attendance, make copies of those events, and message your athletes through those past events.